
Your first day on TableSathi
Everything a new cafe needs on day one — put the menu in, lay out the tables, add your staff, then take the first order, cook it, and settle the bill. Every screen here is the real app.
Before you start
TableSathi runs in a web browser. There is nothing to install to get going — open the link your provider gave you on a phone, a tablet, or the computer at your counter, and sign in.
Sign in with the account you were given
Staff accounts are made by the cafe owner — there is no self sign-up. If you are the owner, your account came with your subscription; if you work at the cafe, ask the owner for your email and password.
The app is in English
Screen and button names in this guide are written exactly as they appear — like
Place Order— so you can match the words on your screen.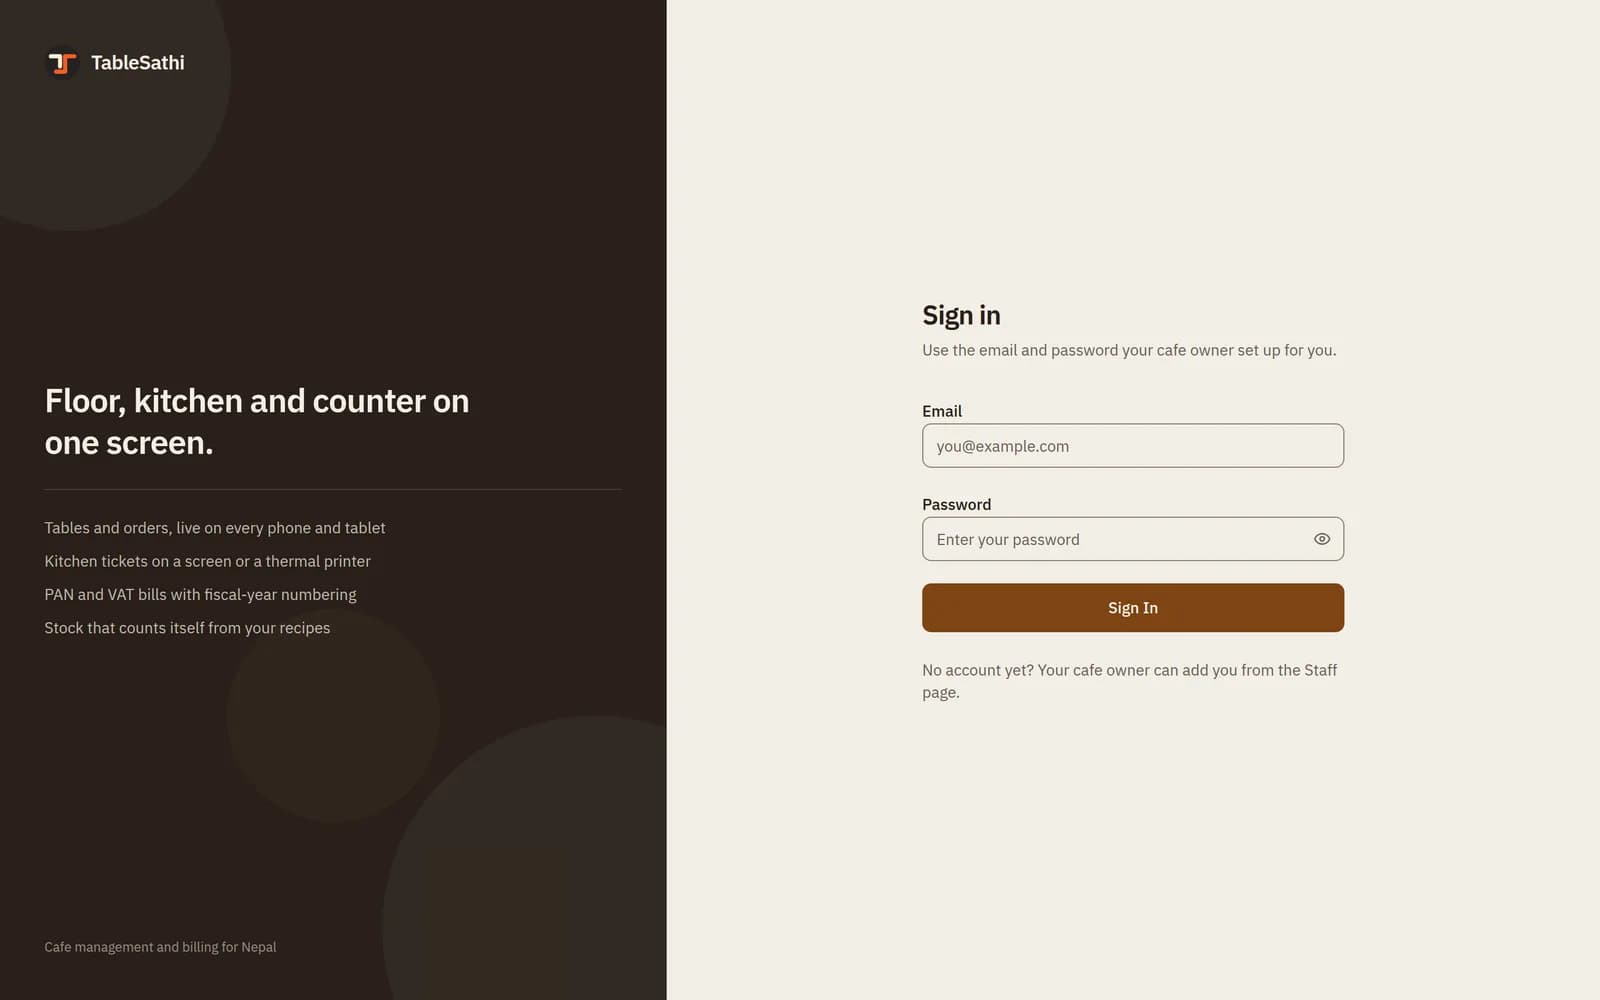
The sign-in screen. Same address for everyone at the cafe; what you see after depends on your account.Open full size ↗
Set up your cafe
For the owner · about 30 minutes, once
Do these six things in order. After the last one, your staff can sign in and start serving.
Put your menu in
Open
Menuin the left sidebar and pressAdd Item. Fill the name, the price in rupees, and a category — typing a new category name creates it. A photo is optional; items without one get a stock photo. LeaveAvailableon so staff can order it.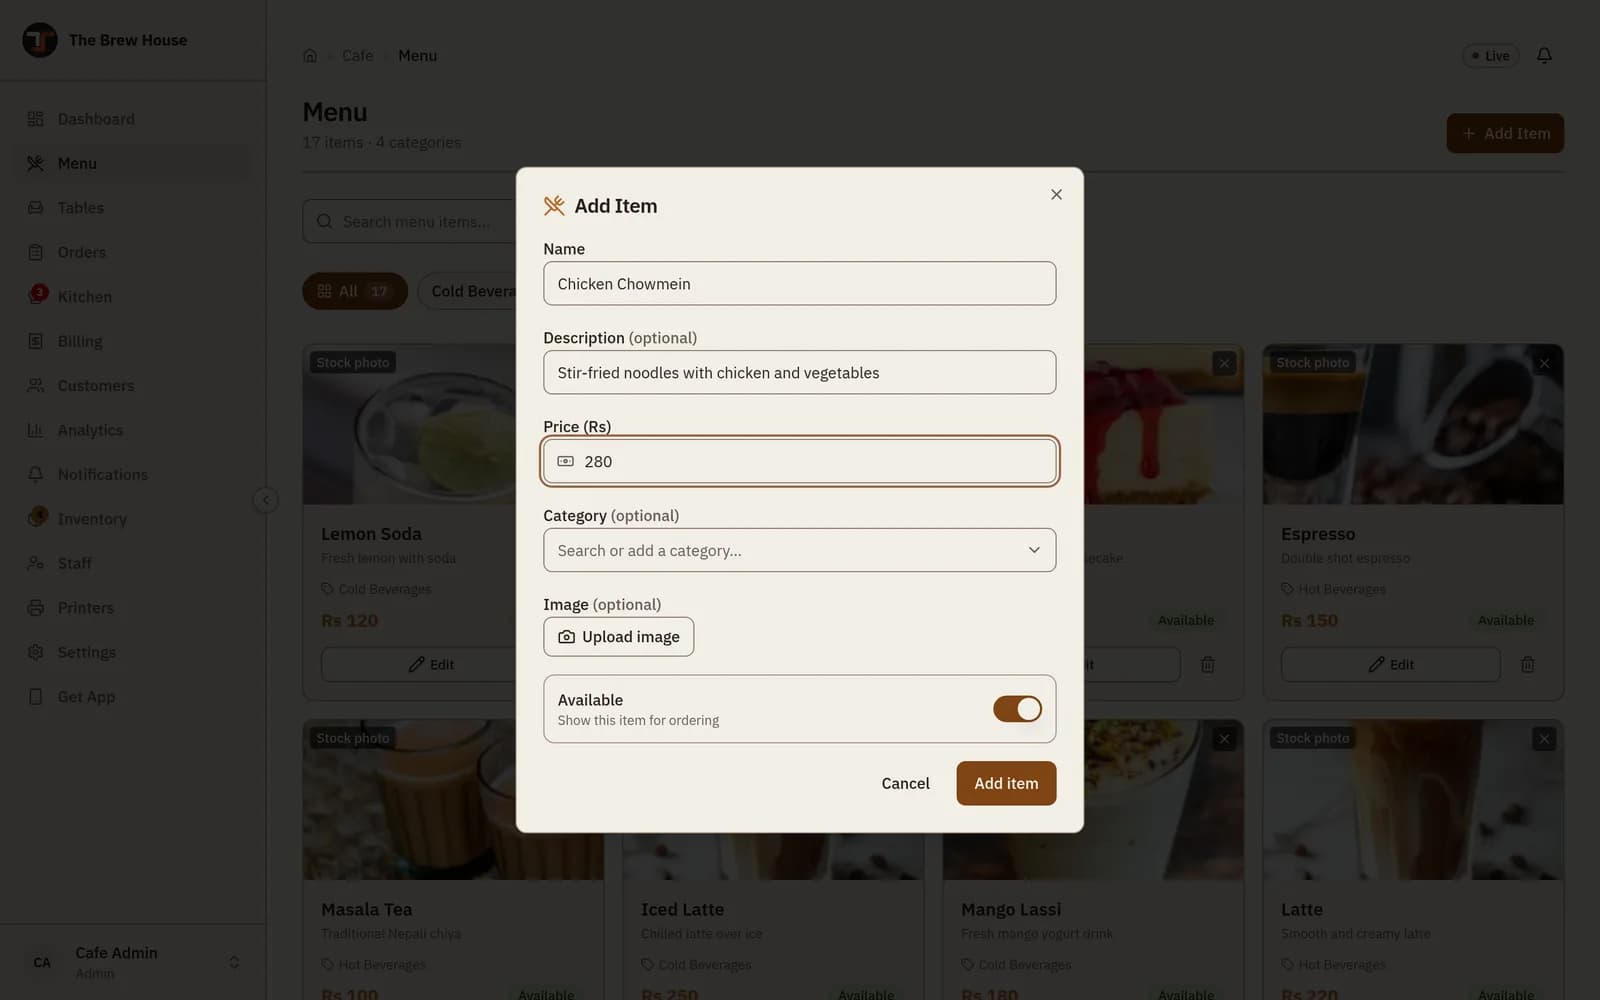
Adding one dish. The price is in rupees — type 280, not 28000.Open full size ↗ 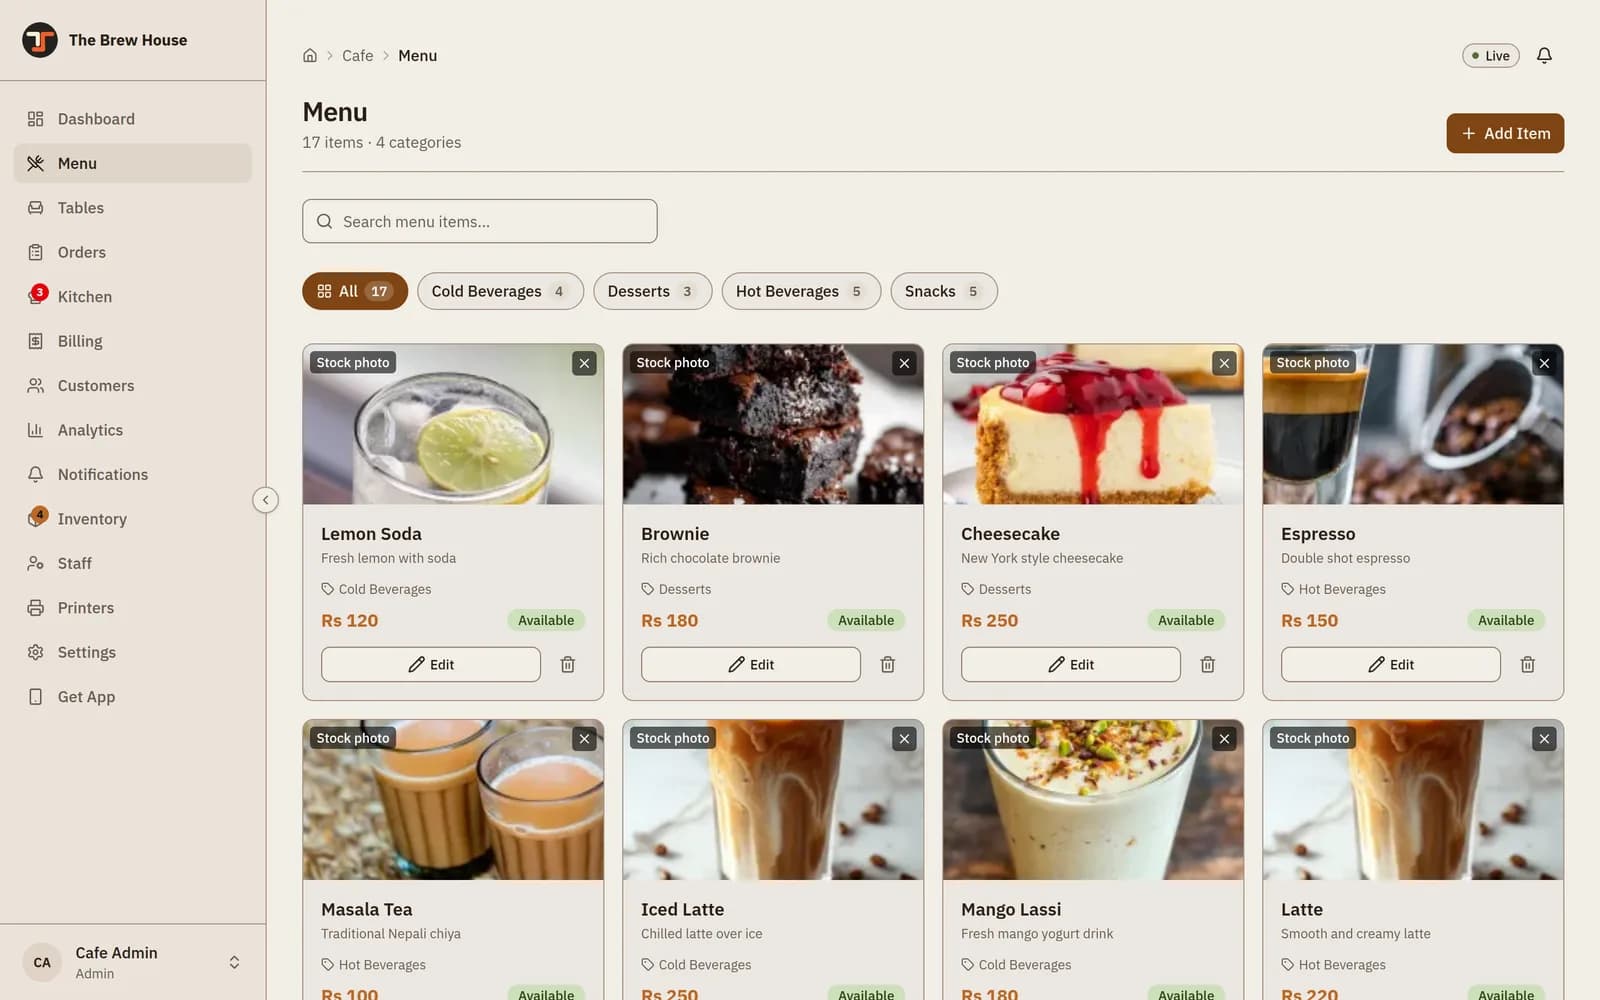
The finished menu. The chips along the top filter by category; press Editon any card to change a price later.Open full size ↗Lay out your tables
Go to
Tablesand pressAdd Tableonce per table. Use the name your staff already shout across the floor —T1,Balcony 1,Rooftop 3. Seats are for your own reference.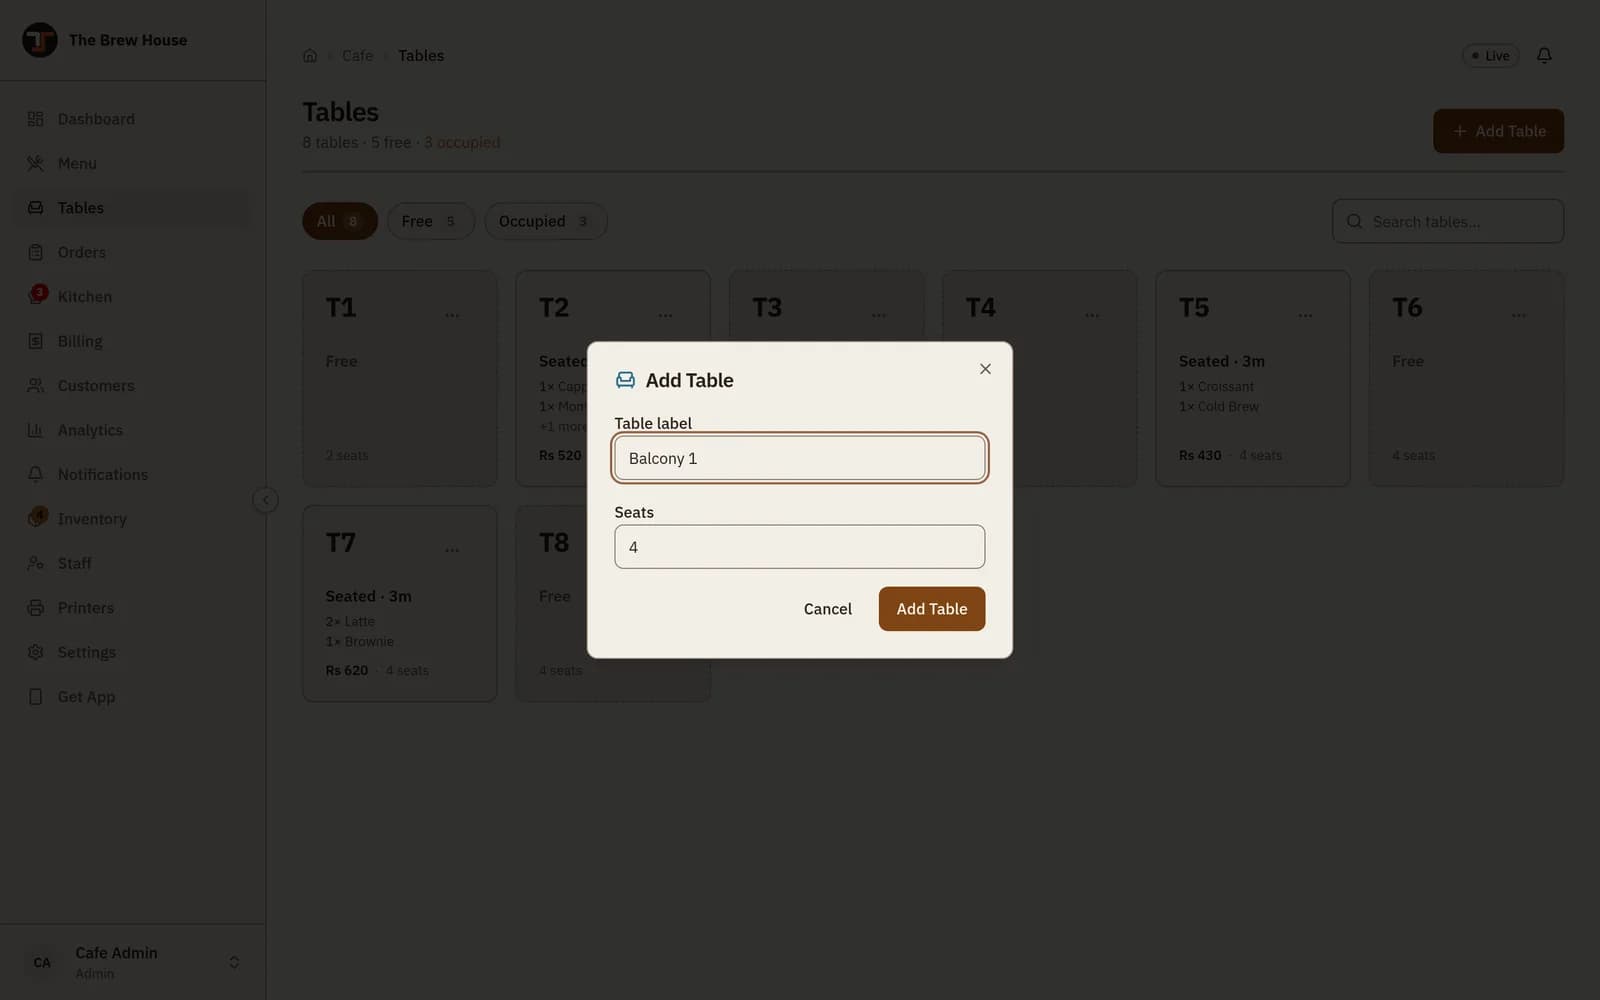
One table at a time. You can add or rename tables any day.Open full size ↗ Set your tax and bill details
Settingshas four tabs. UnderGeneral, put your cafe name, address, phone and opening hours — these show on your public page. UnderBilling, set the currency to NPR, the tax rate to 13, and enter your PAN number.The
VAT registeredswitch changes what prints: on, bills come out as a Tax Invoice with VAT shown out of the inclusive total; off, a plain PAN bill with no VAT line.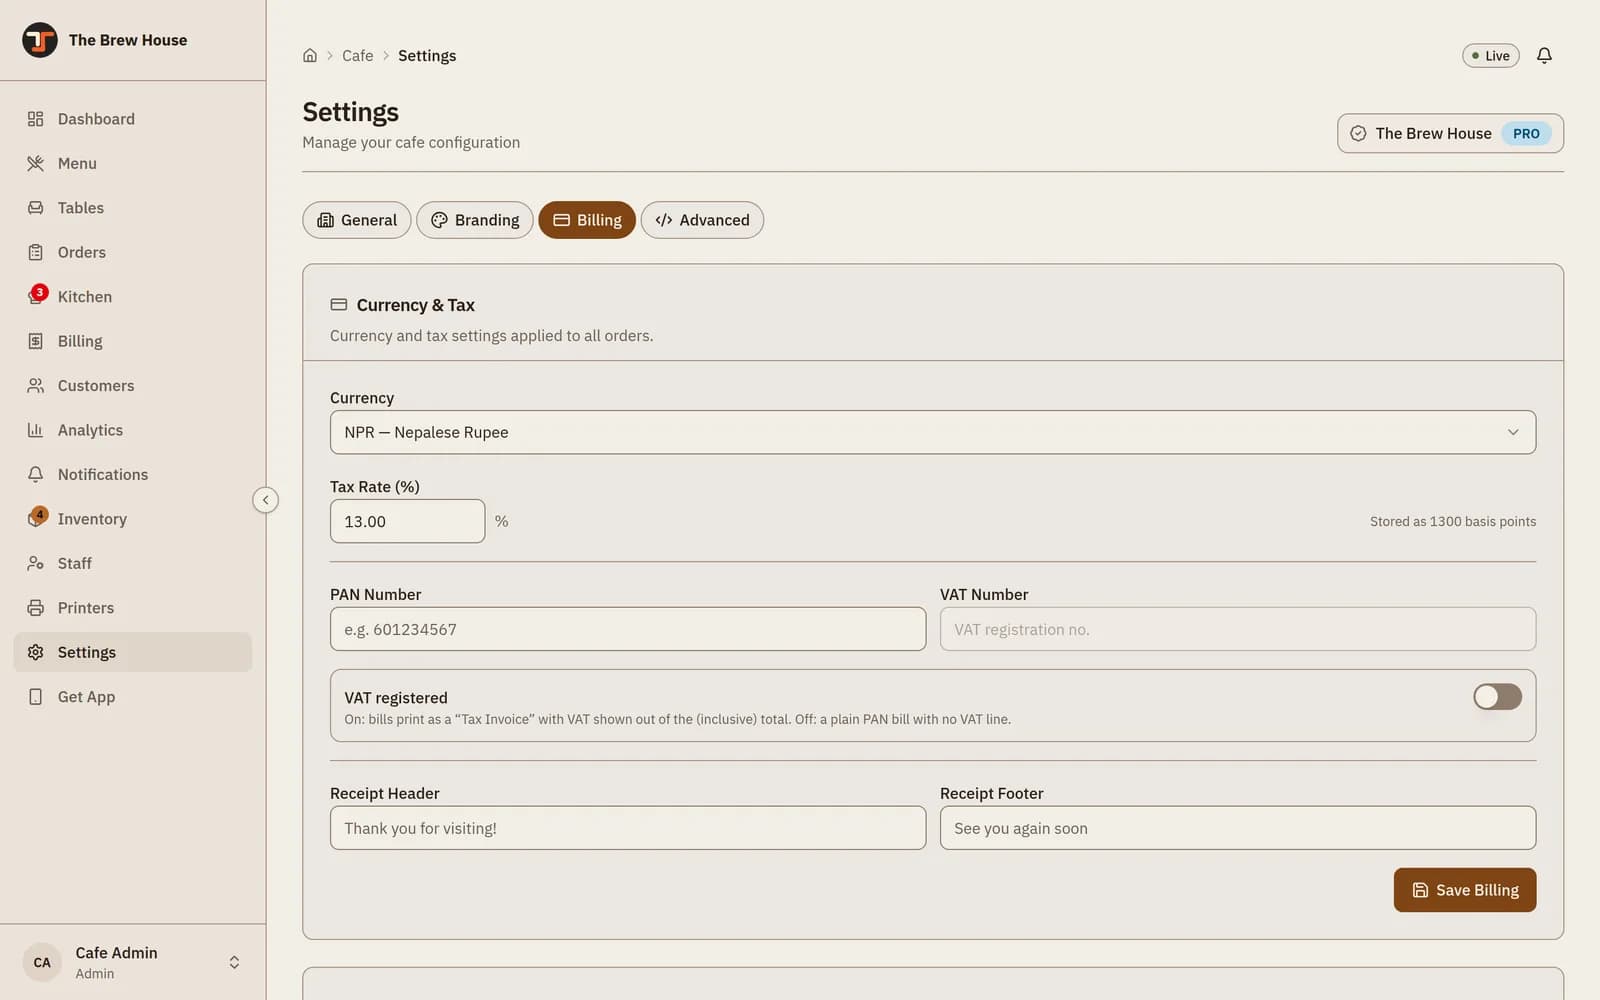
Get this right before the first bill — the numbers here print on every receipt.Open full size ↗ 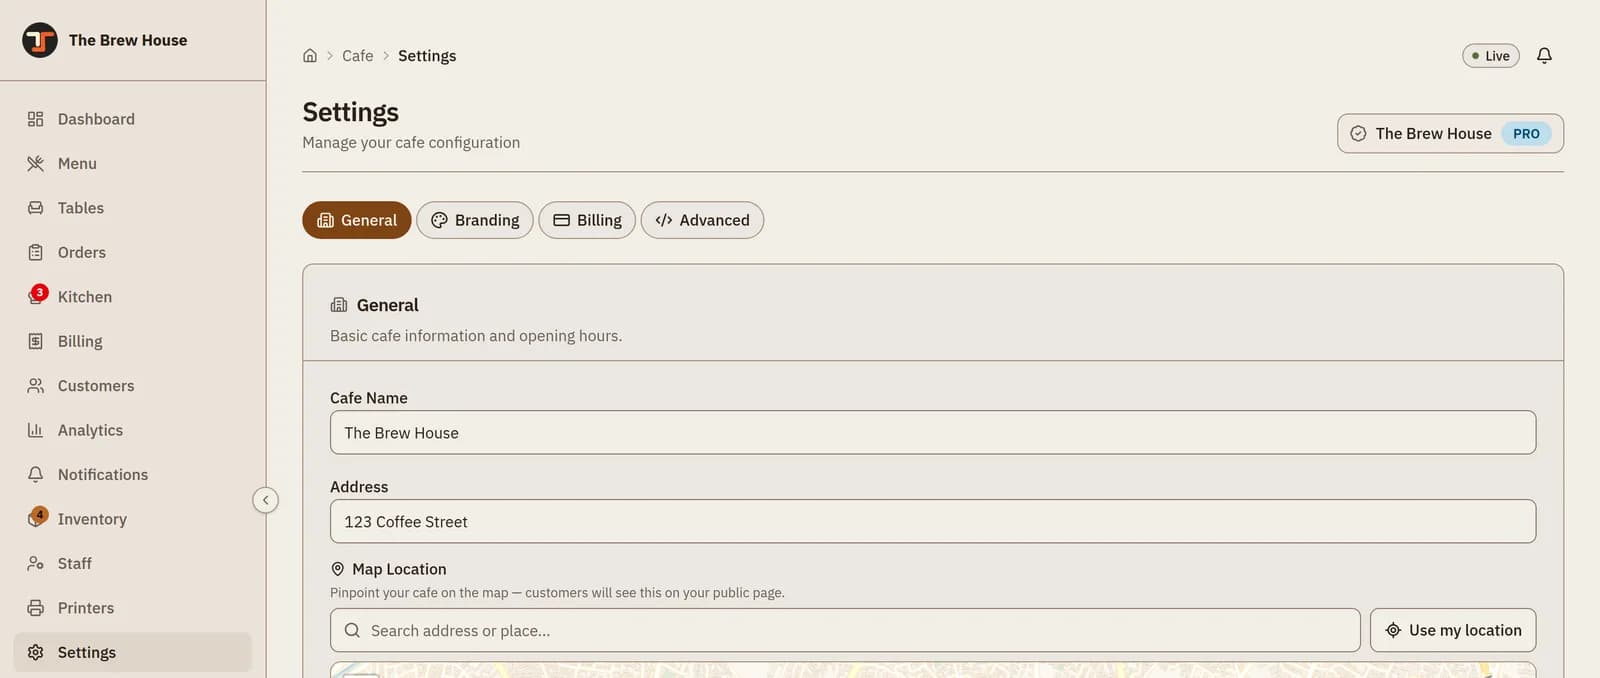
Generalalso holds a map pin. Customers see it on your public page.Open full size ↗Add your staff
Staff→Add Staff. Type the person’s full name; TableSathi builds the email for you and generates a password. Pick the preset that matches the job —Waiter,Cook,CashierorManager— then pressCreate Staff.Write the password down
The password appears once. Press
Download Credentialsor copy it somewhere safe before you pressDone— it cannot be viewed again. If it is lost, you can reset it from the⋯menu next to that person.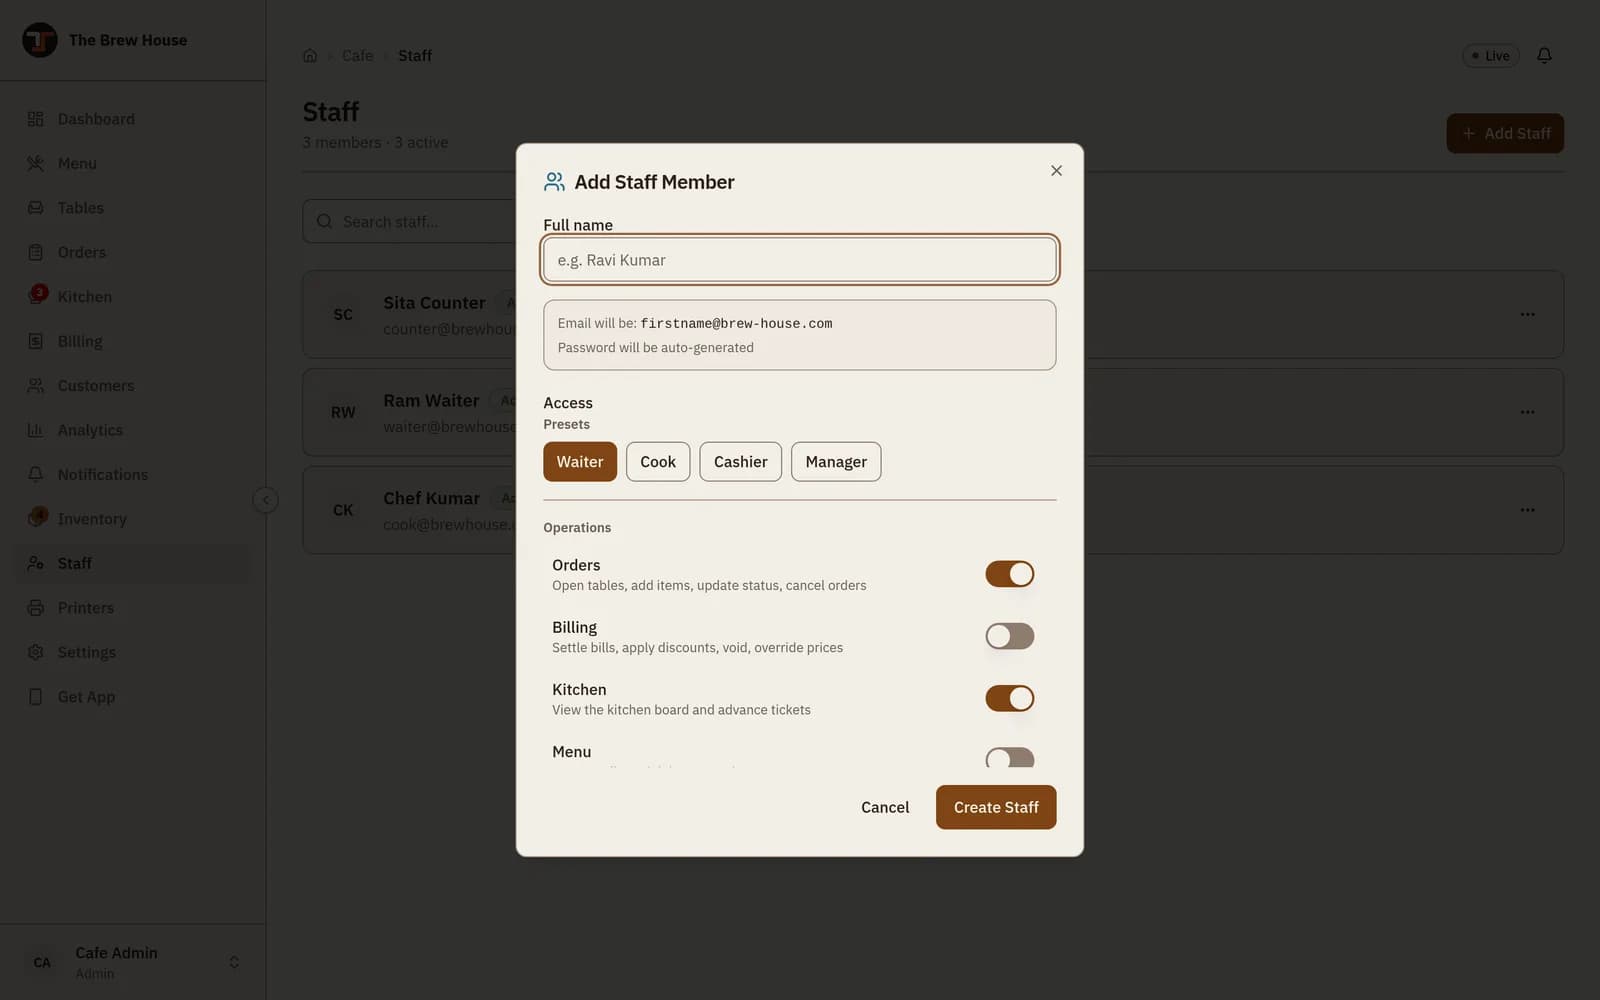
Name first, job second. Everything else is filled in for you.Open full size ↗ 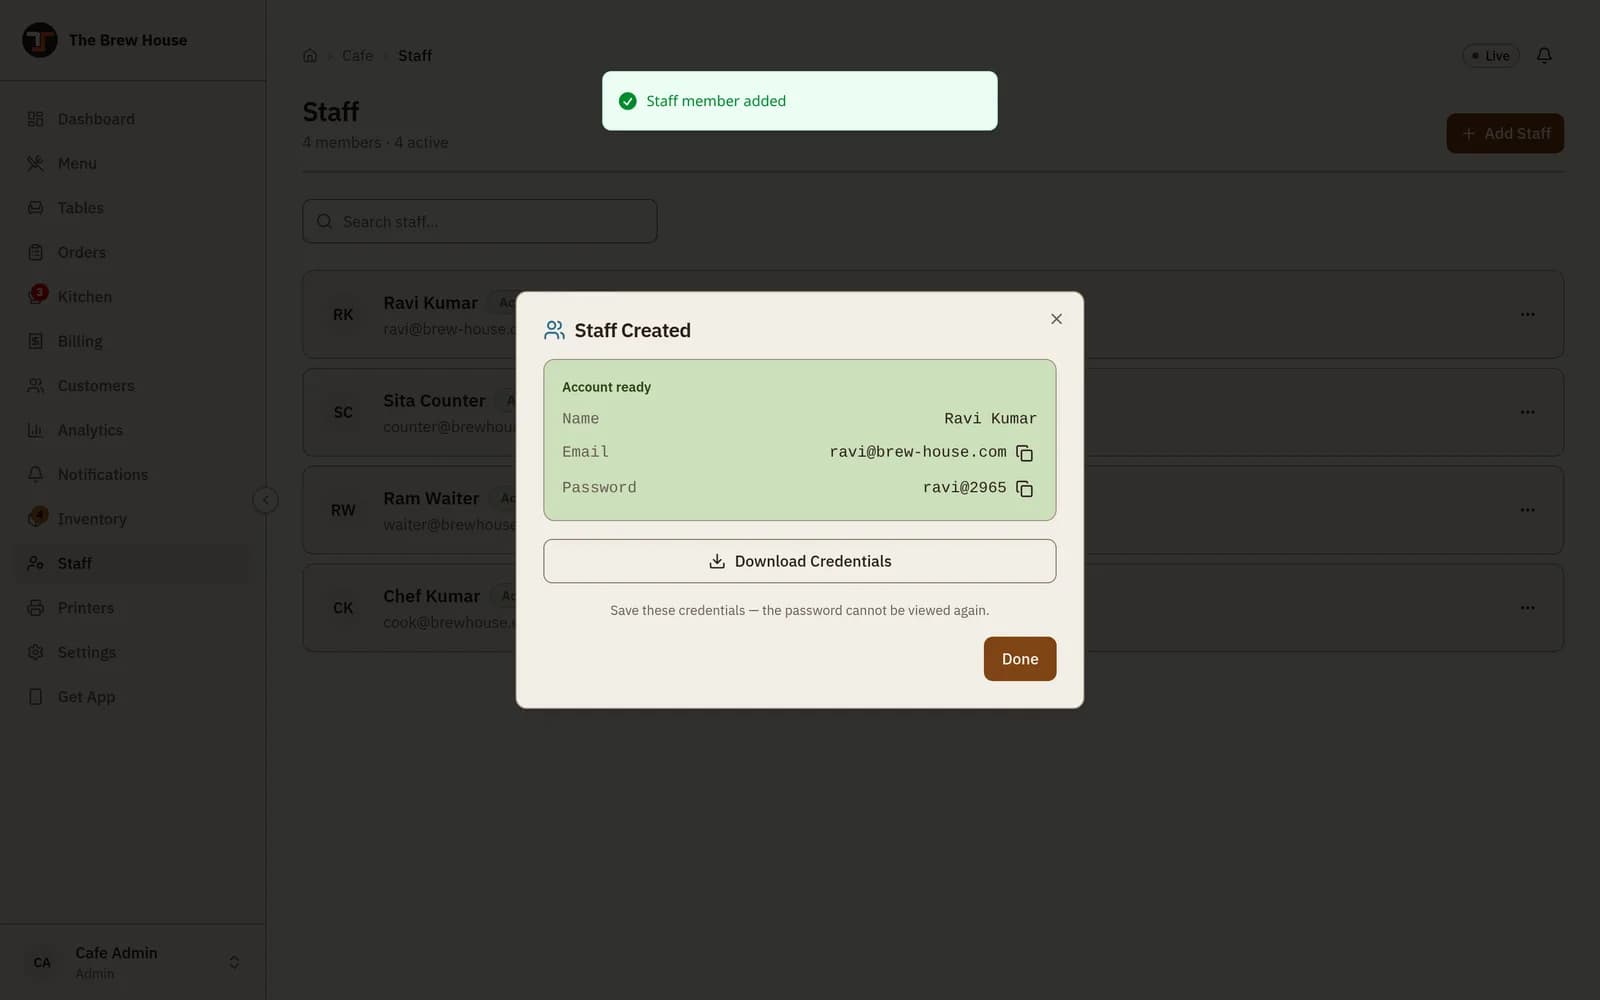
Hand these two lines to the person. They sign in with them.Open full size ↗ Give each person only what they need
A waiter does not need the sales reports; a cook does not need to settle bills. Open the
⋯menu beside anyone on theStaffpage and choosePermissions. A preset sets the usual switches in one tap, and you can then turn any single one on or off. PressSave.Changes take effect the next time that person loads a screen — you do not need to make them sign out.
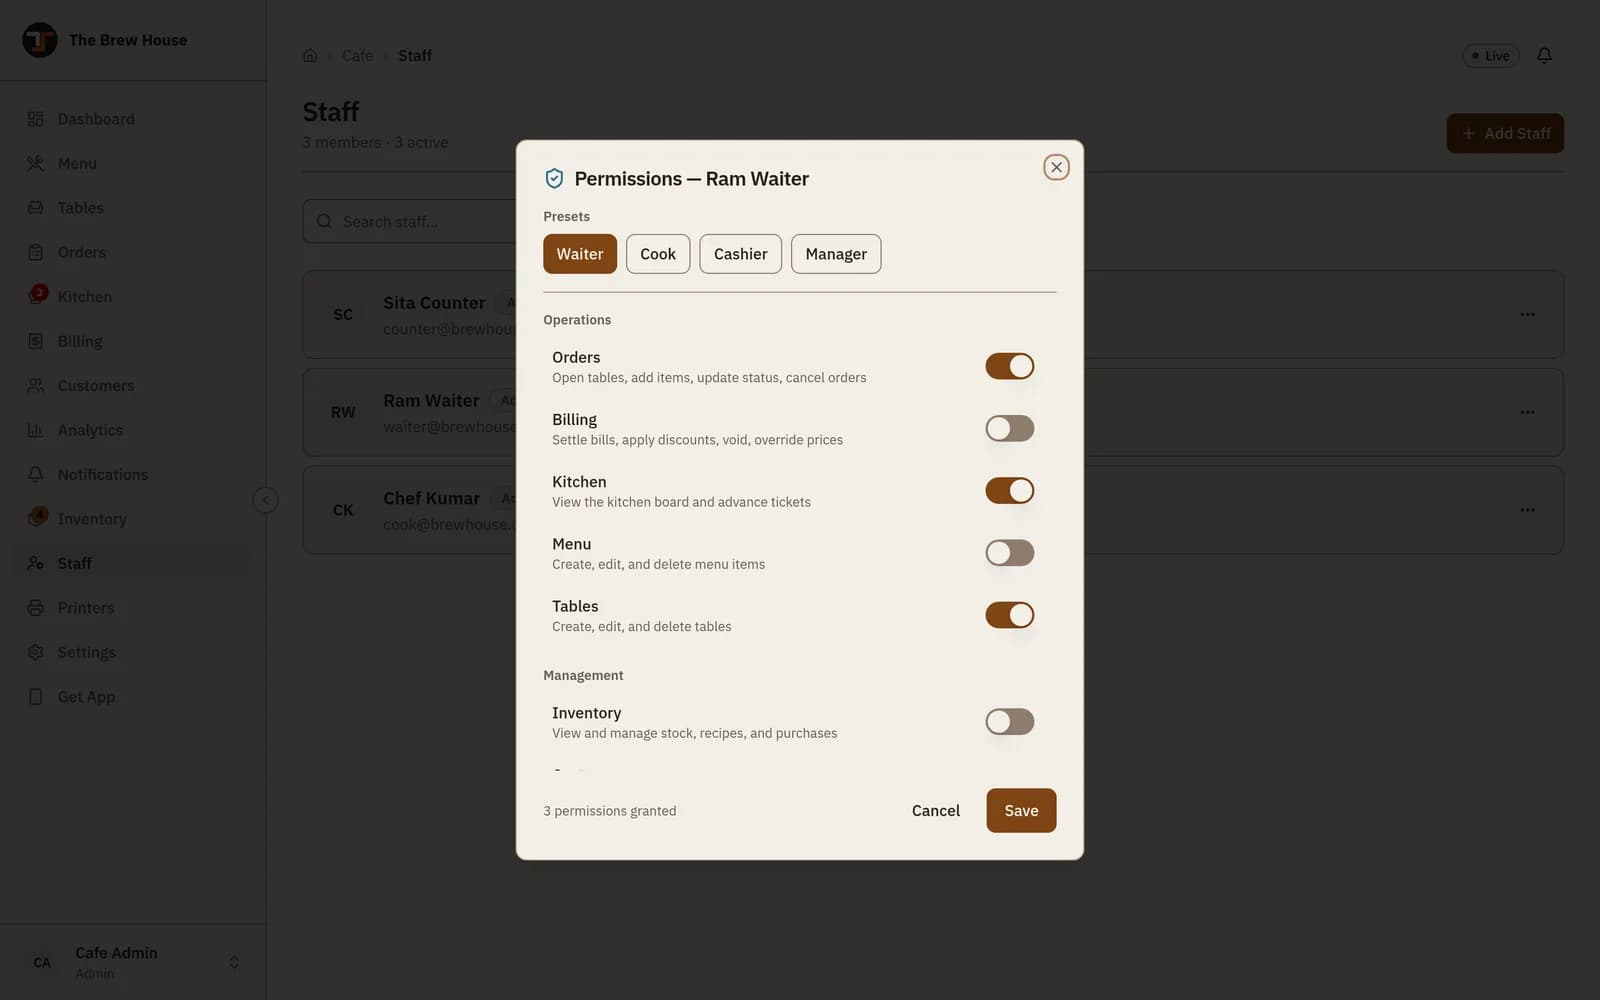
The Waiterpreset: orders, kitchen and tables on; billing and everything underManagementoff.Open full size ↗Check the dashboard
Dashboardis your view of the floor: today’s revenue, how many tables are in use, which bills are still open, and the last few orders. It updates on its own — theLivedot at the top right means the screen is current.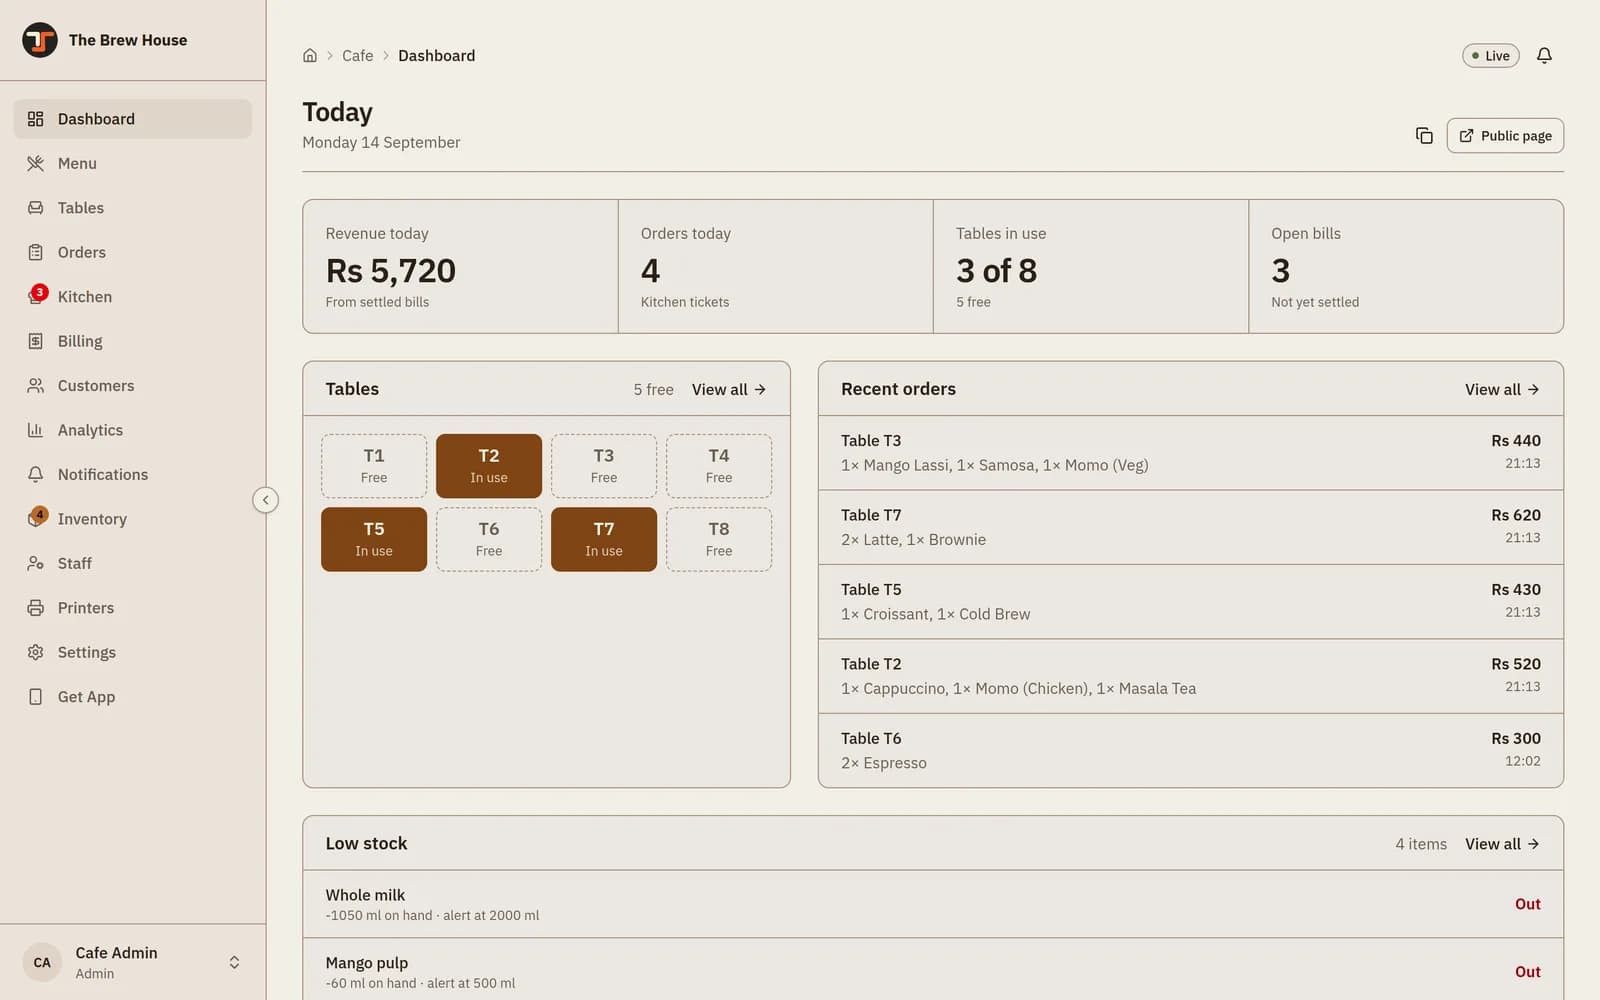
Filled tiles are tables in use; dashed ones are free. Low stockfurther down warns you before you run dry.Open full size ↗
Take an order
For waiters · every table, every time
Orders start on the floor, not on the Orders page. You pick a table first, then the food.
Tap the table the guests sat at
Open
Tables. Dashed outlines are free, filled ones are already in use. Tap a free table and it opens for that party — this is what the app calls a session, and it stays open until the bill is settled.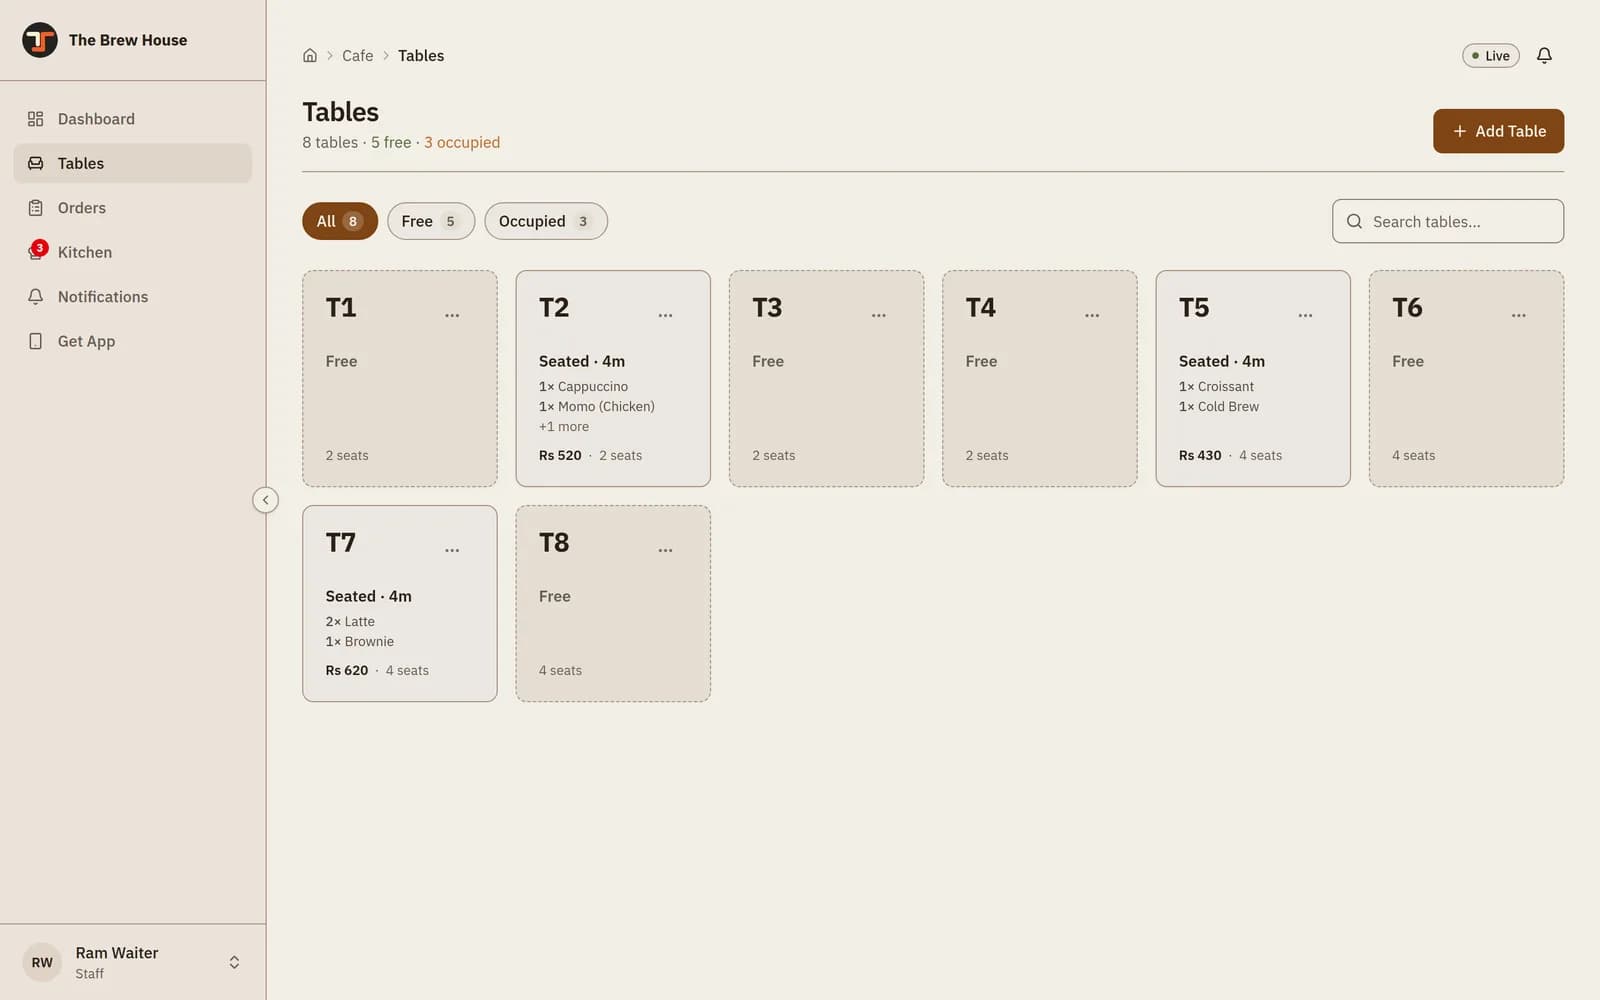
A waiter’s sidebar is short on purpose — only the screens that person was granted.Open full size ↗ Tap a dish to add it
Tap anywhere on a dish — the photo, the name, the price — and one is added. Tap it again for a second. A minus and plus bar appears on anything you have picked. Use
Search menu...or the category chips on a long menu, and the3 4 5control to fit more dishes on a small screen.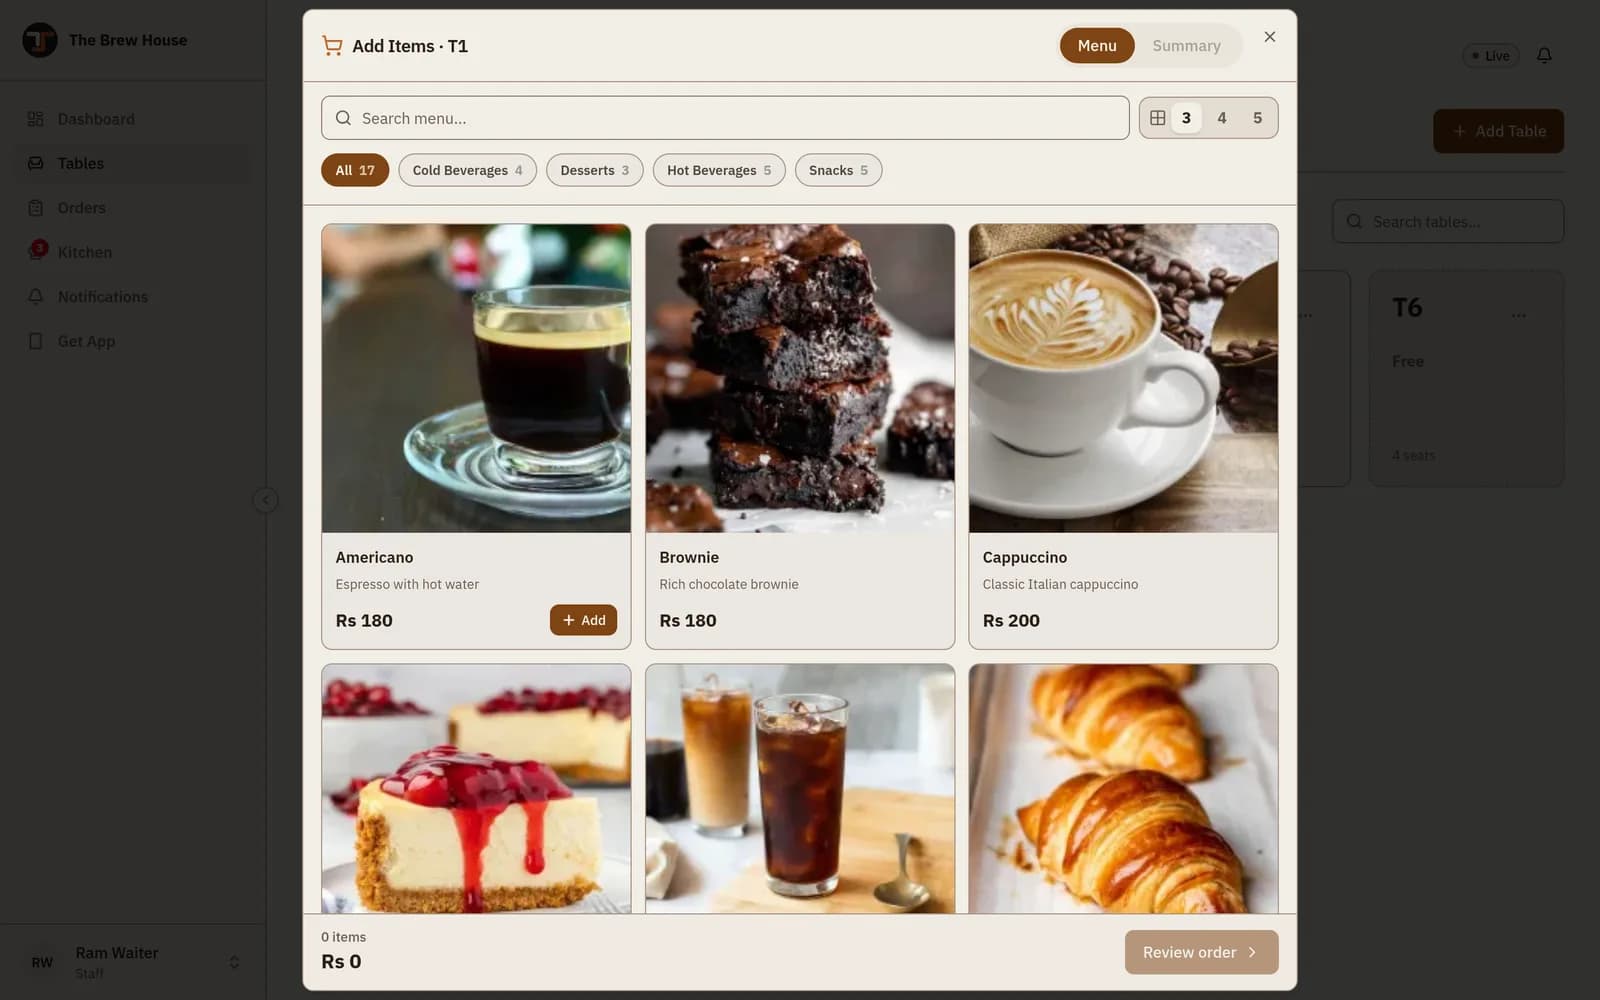
Picking dishes for table T2. The running total sits bottom left.Open full size ↗Check it, then send it
Press
Review order. Change quantities, remove a line with the bin icon, or press+ Add noteto tell the kitchen something — “no sugar”, “extra hot”. Read the order back to the guest, then pressPlace Order.The kitchen sees it the moment you press it. Nothing else needs doing.
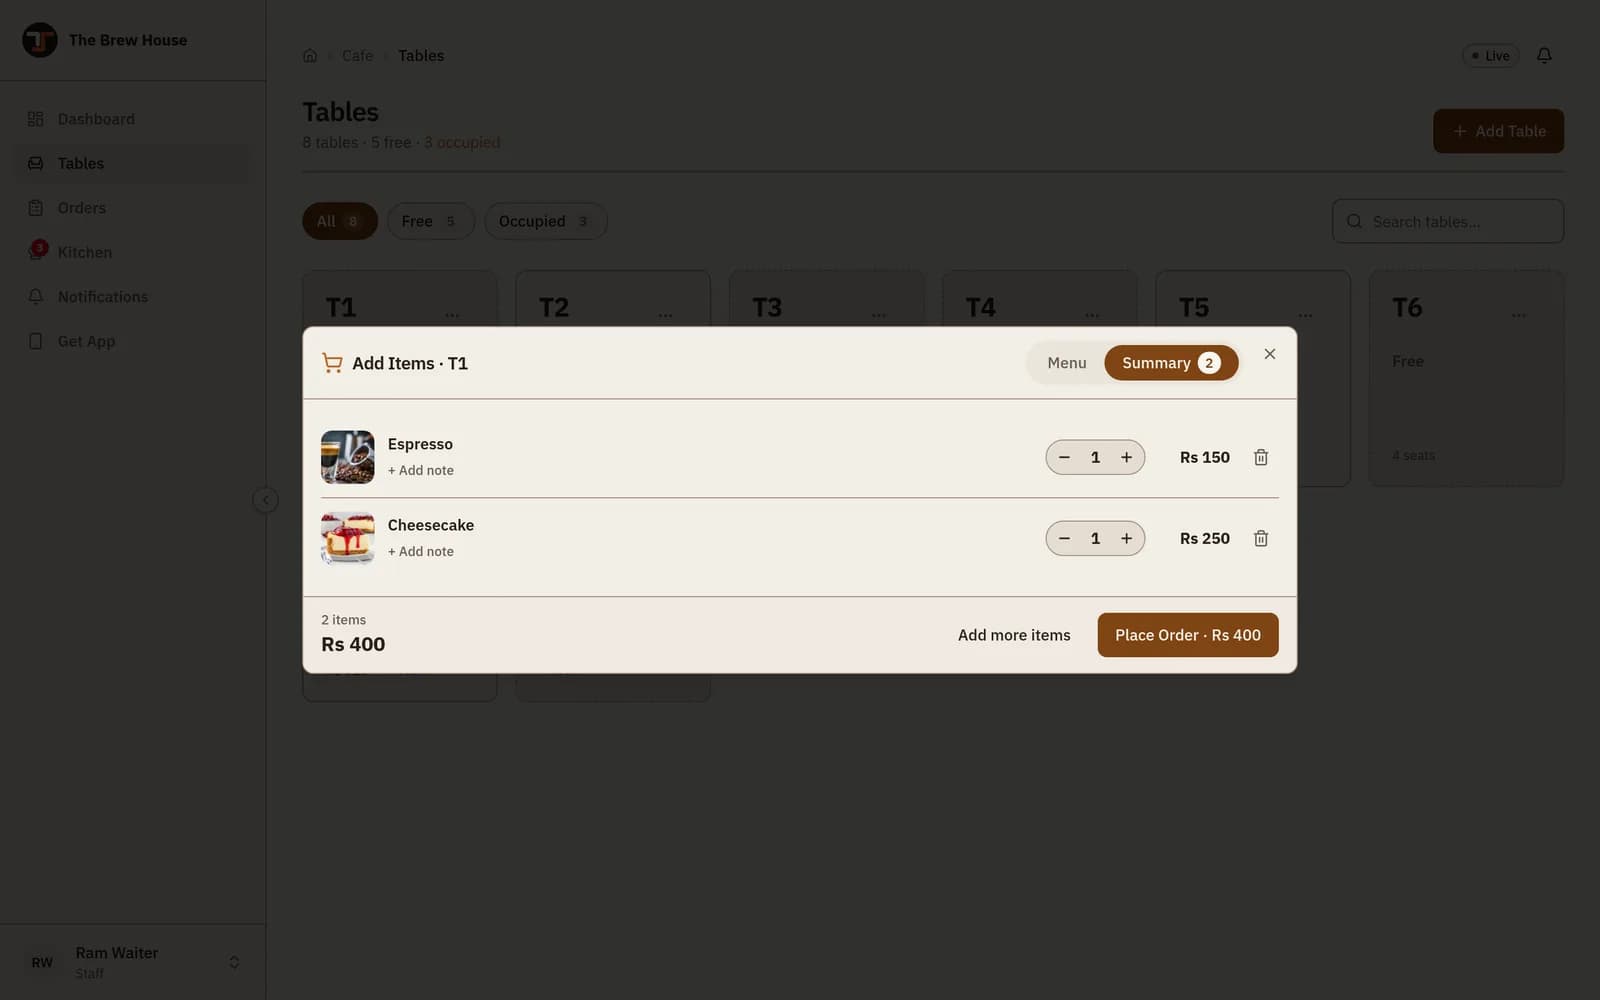
The last look before it reaches the kitchen.Open full size ↗ More rounds go on the same table
When the same guests order again, tap that table — now shown as in use — and add the new items. They join the same bill.
Orderslists every ticket of the day with its status, so you can see at a glance what is still pending.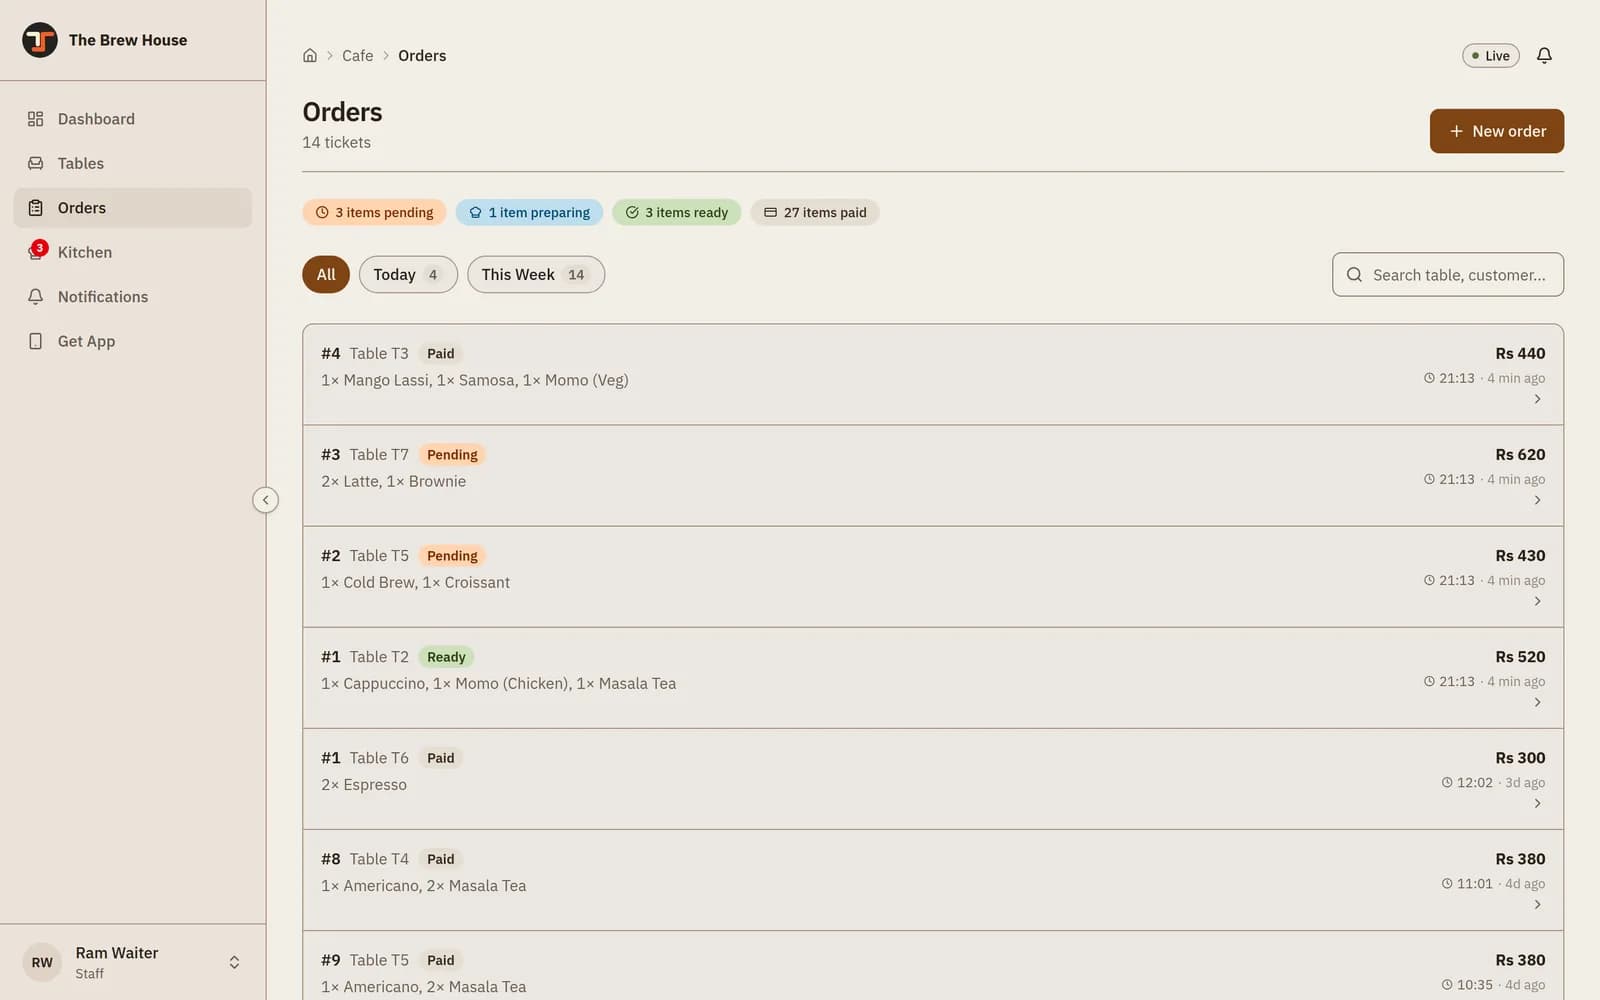
Every ticket, newest first. The counts along the top are today’s items by status.Open full size ↗
Work the kitchen screen
For cooks · one screen, two buttons
Kitchen shows one card per order. Each card carries the table, how long it has been waiting, and every item on it. New orders arrive by themselves.
Press Start when you begin cooking
Starton one item marks just that item. If you are starting the whole ticket, pressPrepare Allat the bottom of the card and confirm — one tap instead of five.Press Mark ready when it can go out
A started item’s button turns into
Mark ready. Press it and the item shows a greenReadytick. The waiter’s screen changes at the same moment, so nobody has to come and ask.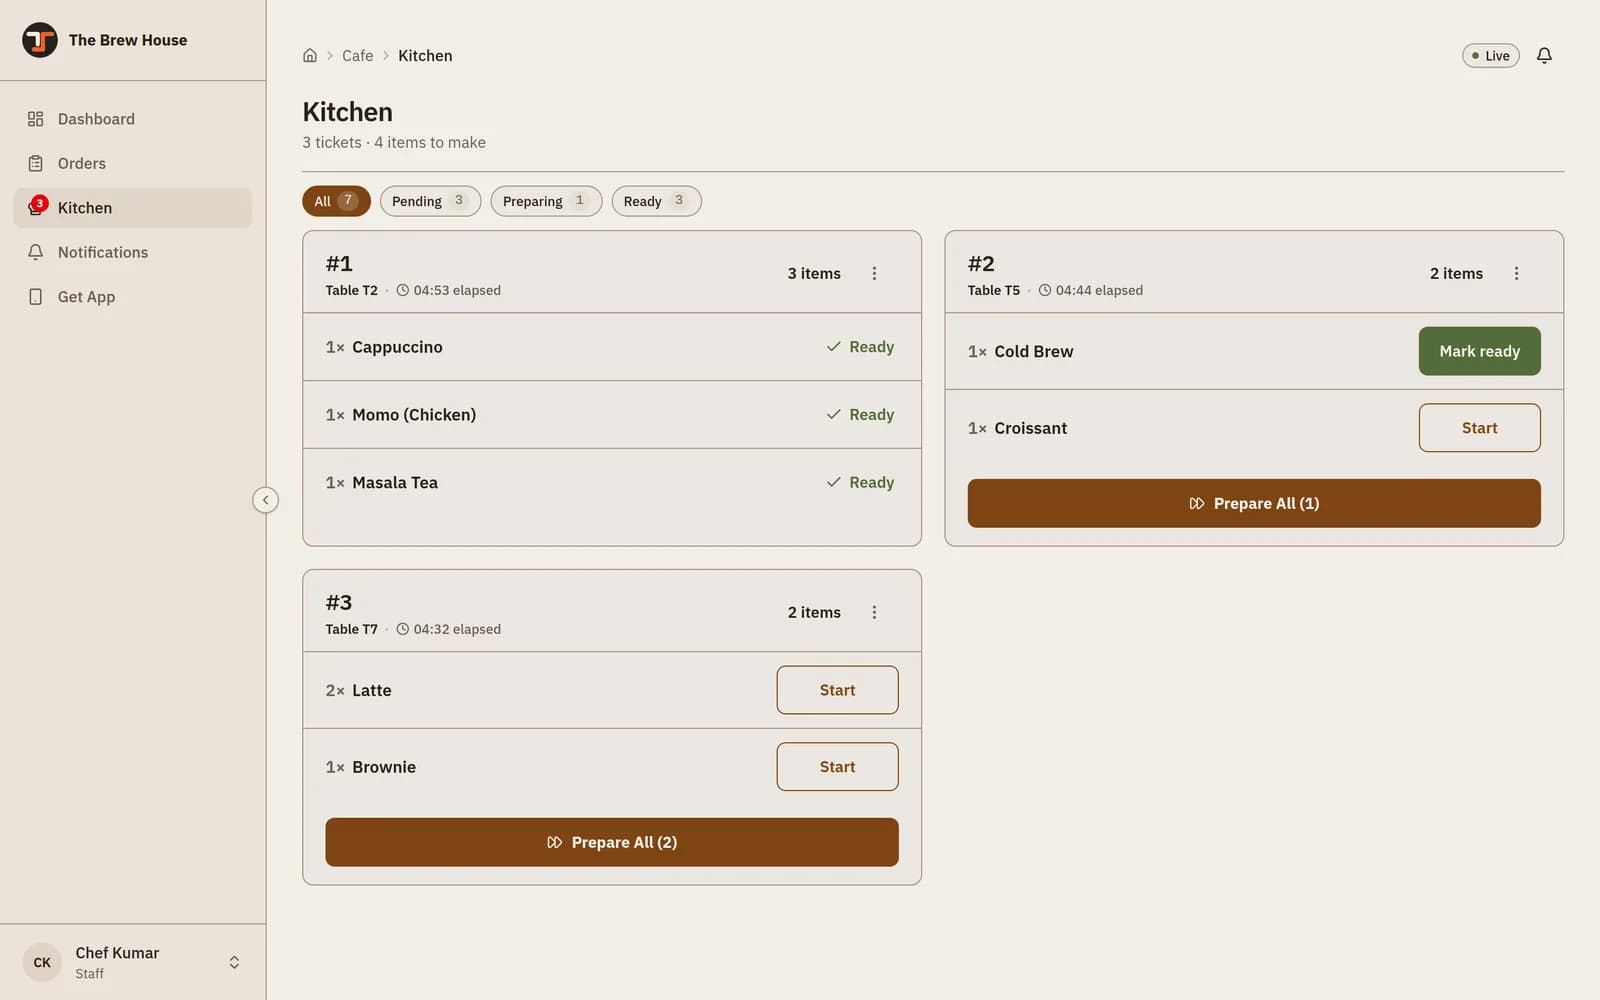
Three tickets, three stages. Ticket #1is done, ticket#2is half cooked, ticket#3has not been started.Open full size ↗Use the filters when it gets busy
The chips at the top —
All,Pending,Preparing,Ready— narrow the board to one stage. The clock on each card counts up, so the ticket that has waited longest is easy to spot.
Settle the bill
For the counter · the last step of every table
Billing lists every table with an open bill and what it owes. Pick one to see its items.
Open the table’s bill
The right side shows every item and the total.
Add customerattaches a phone number so the visit joins that customer’s history.Add discounttakes an amount off.Print Billgives the guest a paper copy before they pay.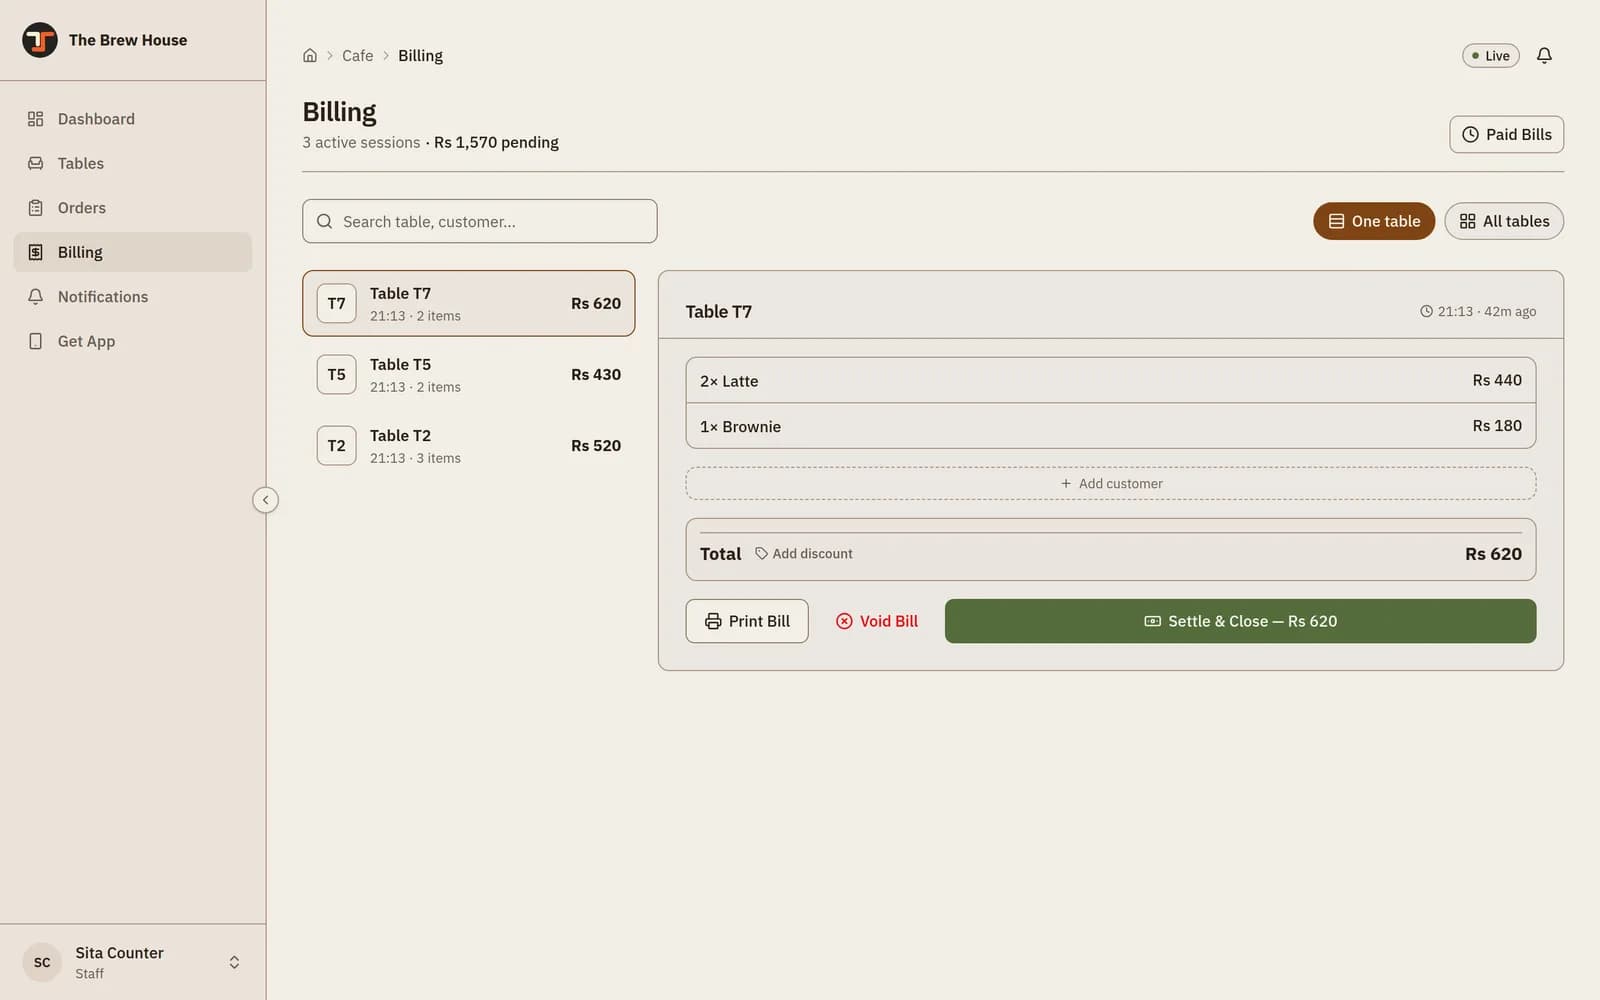
Tables still to pay, and what they owe between them.Open full size ↗ Two ways to lay the bills out
One tableis the view above — a list to find the table, the bill beside it. It is what you want when guests come to the counter one at a time.All tableslays every open bill out as cards, the way the kitchen board lays out tickets — nothing to pick first, every total and everySettle & Closeon one screen. Useful at closing, or when three tables call for the bill at once. Whichever you pick stays put when you reload.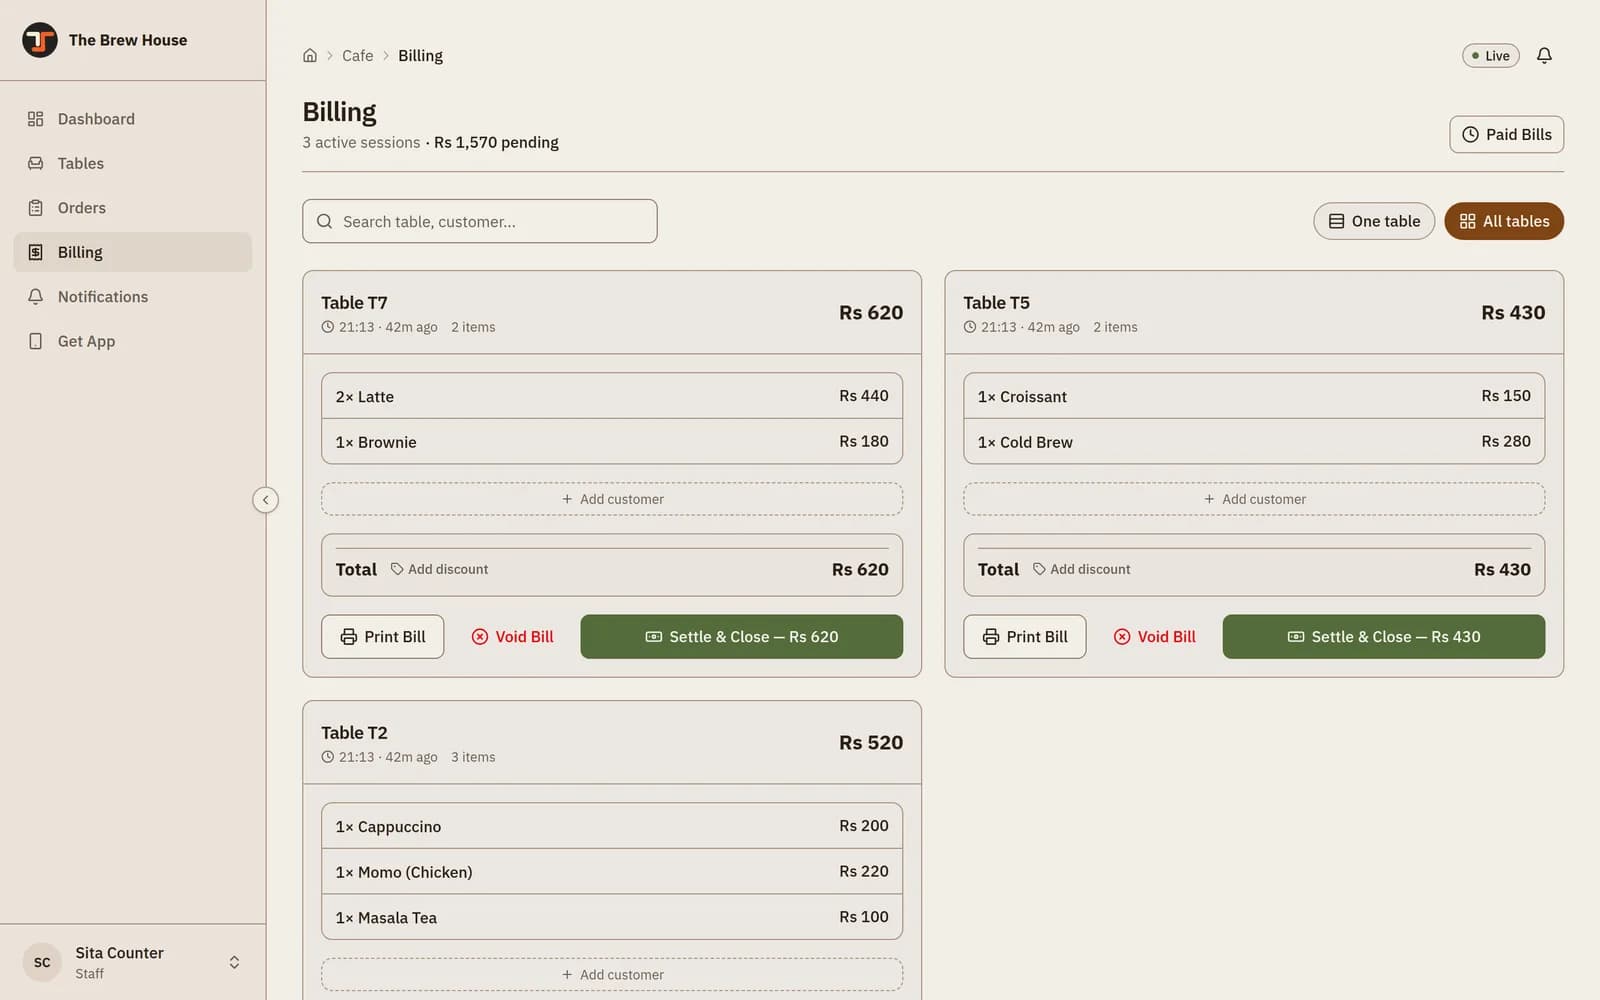
Every open bill at once. Settle & Closestill asks you to confirm cash or online before anything is filed.Open full size ↗Take the money, then close it
Press
Settle & Close, chooseCashorOnline, and confirm. The bill is numbered and filed, and the table goes back to free straight away.This cannot be undone
Settle only after the money is in hand. A settled bill cannot be edited — a mistake has to be corrected with a credit note. If the guests leave without paying, or the table was opened by accident, use
Void Billinstead.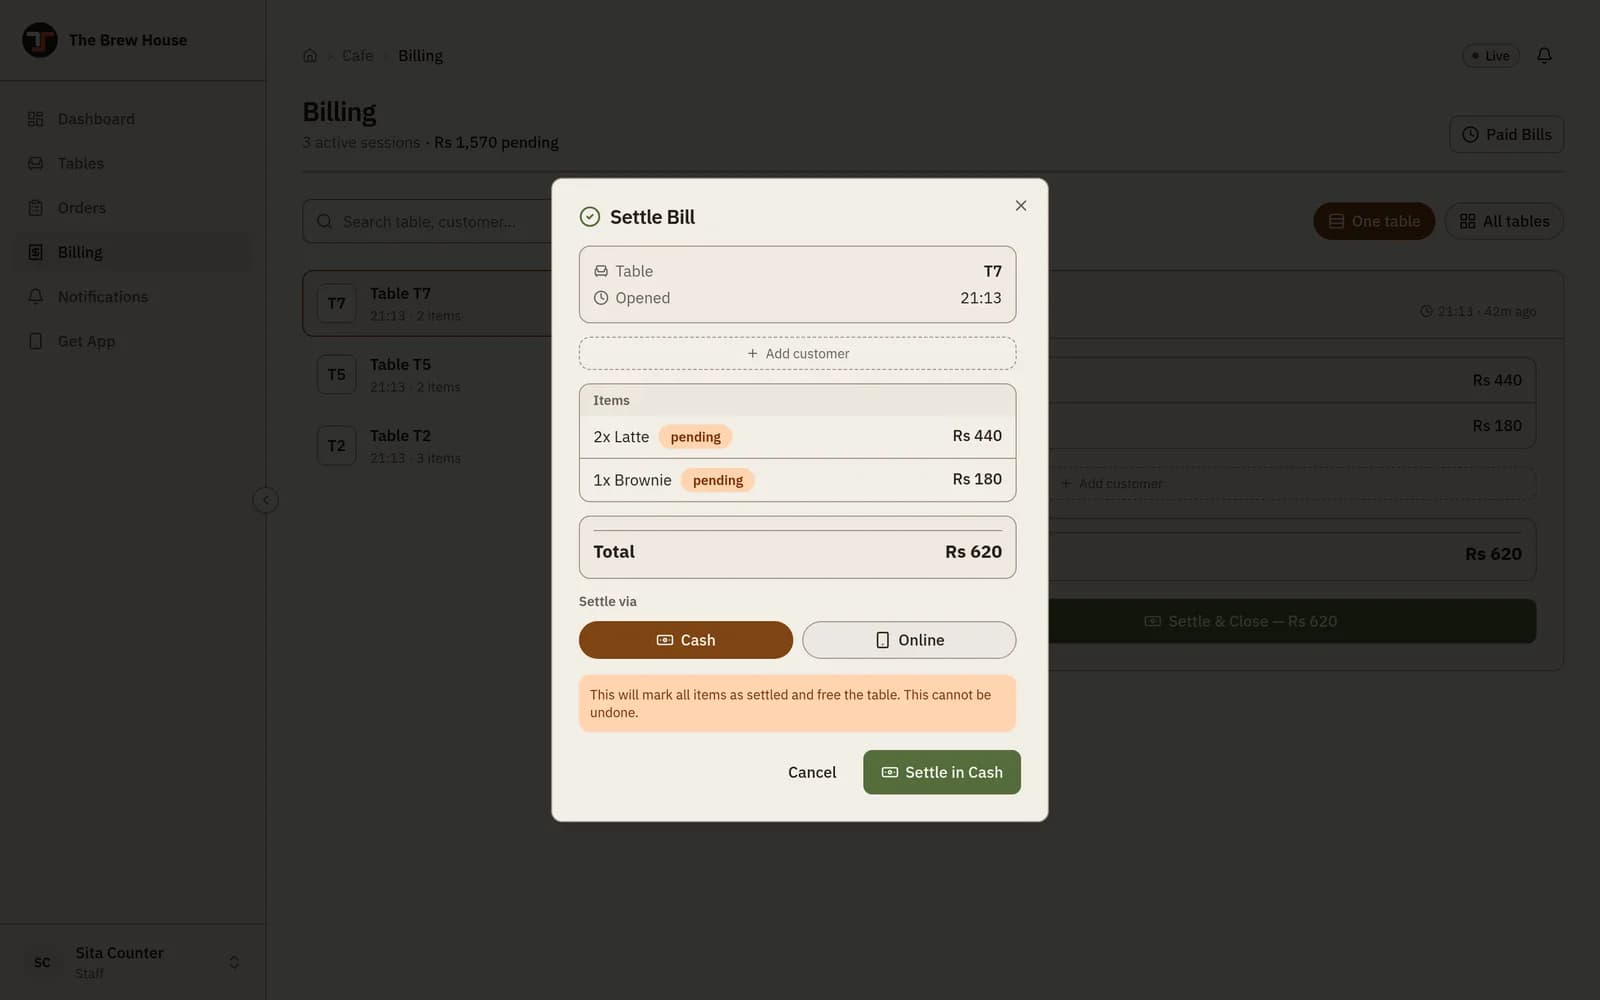
Cash or online — the choice is recorded, so the day’s takings split correctly.Open full size ↗ Find a bill again later
Paid Billskeeps every settled bill with its invoice number. TheSales registerthere covers one tax period in the shape the IRD expects.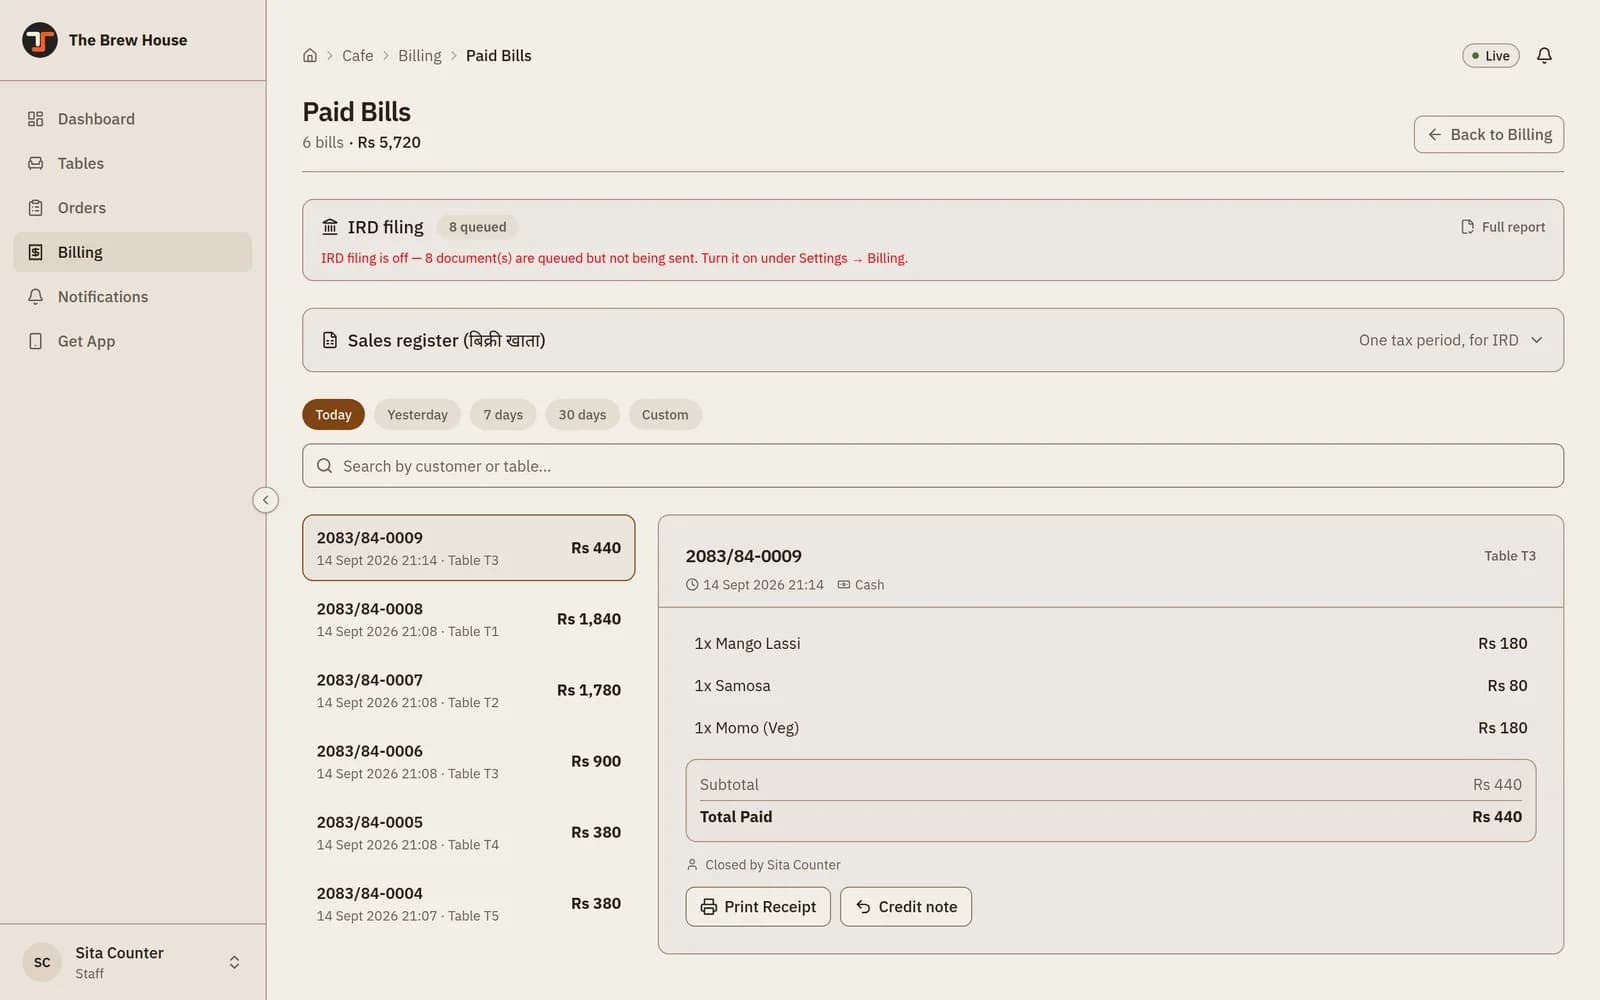
Every settled bill of the day. IRD e-filing is a separate switch under Settings→Billing.Open full size ↗
When the first week is over
None of this is needed to serve a customer. Come back to it once the floor is running smoothly.
See what actually sells
Analyticscovers a day, a week, a month or a whole fiscal year: net revenue, average bill, items sold, discounts given. Once dishes have ingredient recipes underInventory, it also shows the profit on each one.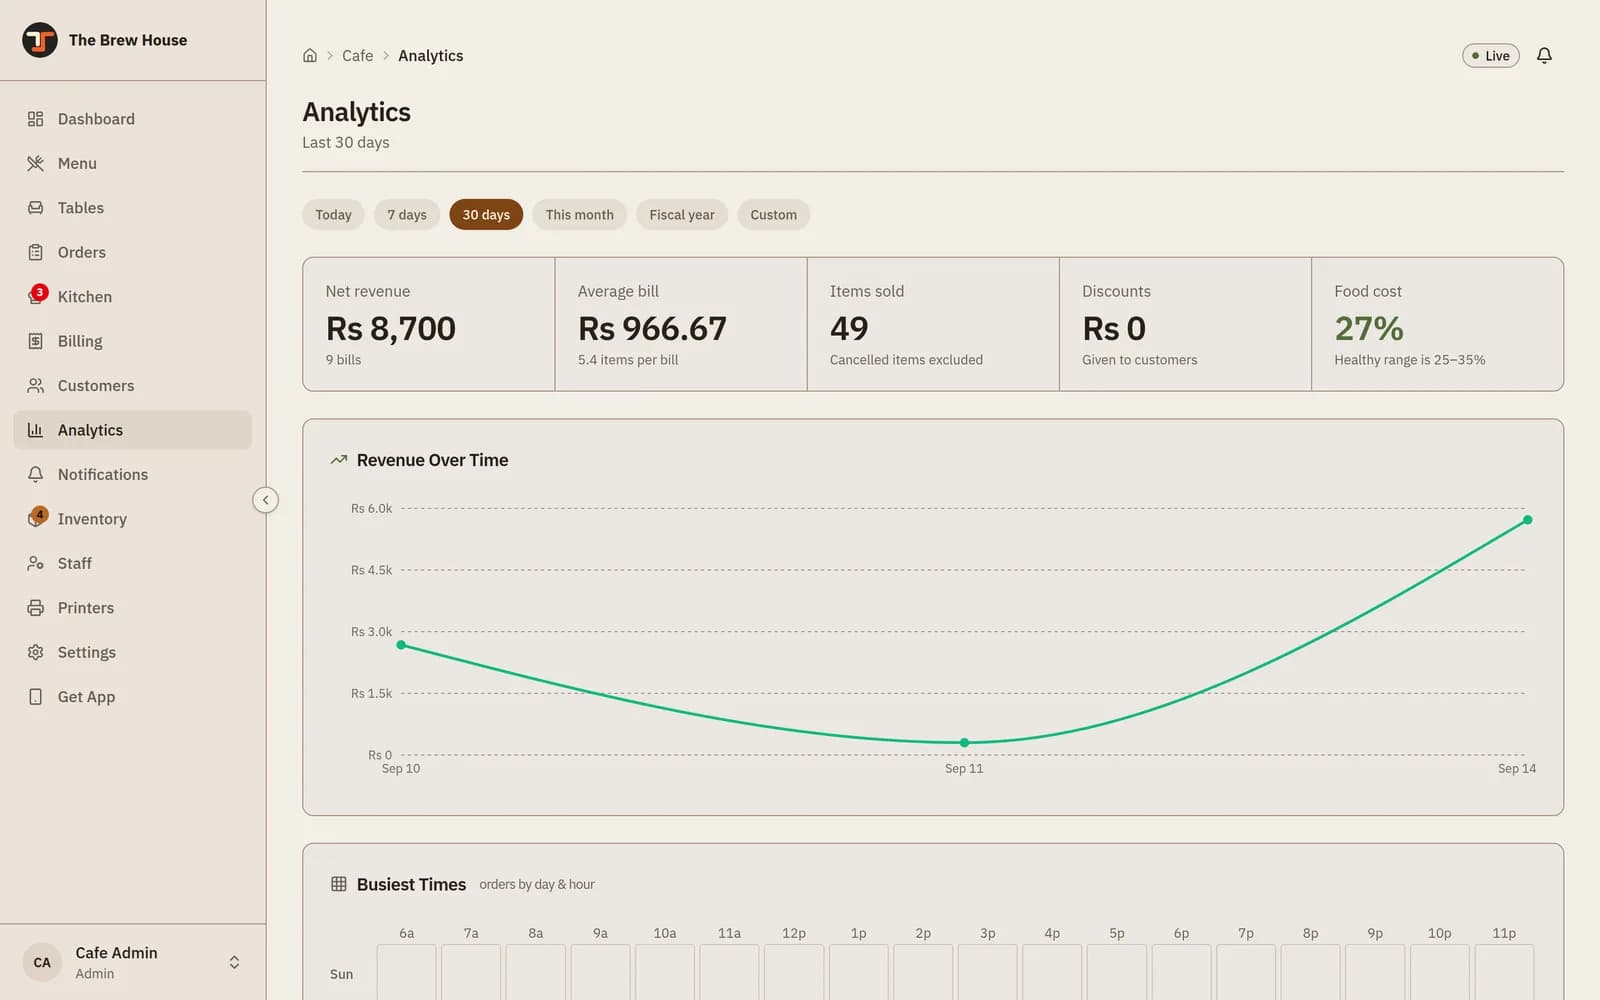
Thirty days at a glance, with a fiscal-year range for your accountant.Open full size ↗ Print kitchen tickets and bills on paper
A thermal printer needs
TableSathi Agent, a small program on the computer the printer is plugged into. Download it fromPrinters, install it, and pair it with the one-time code shown there. After that, finalised bills print by themselves.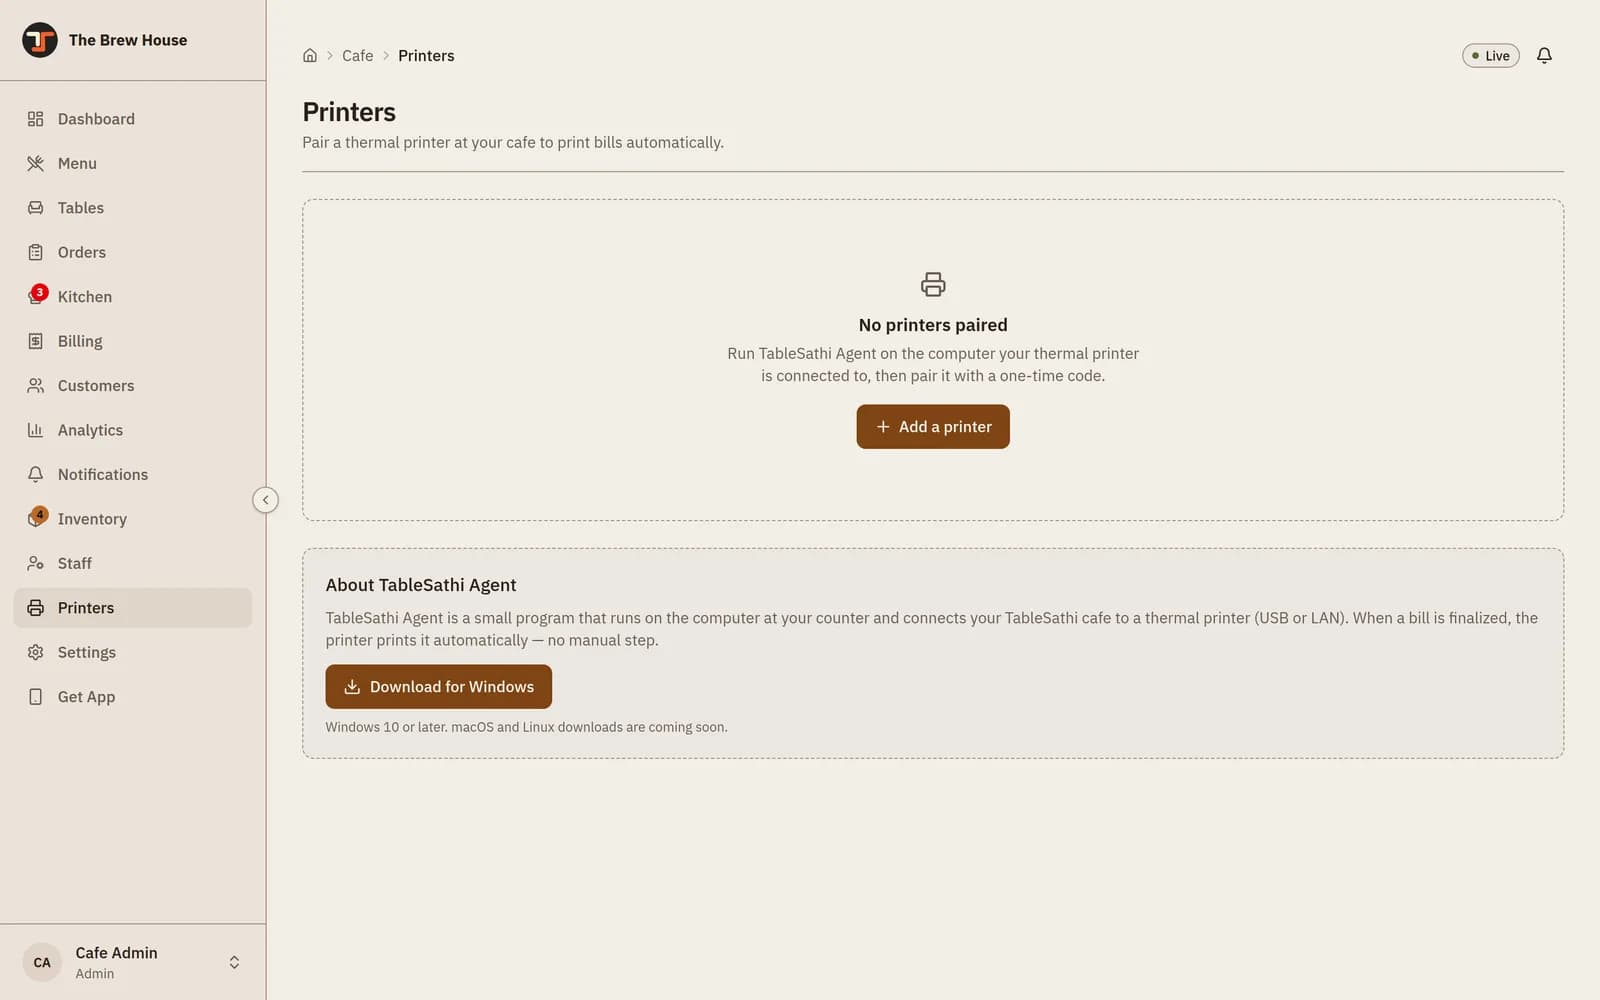
Windows 10 or later today; macOS and Linux are coming.Open full size ↗ Put it on your staff’s phones
Get Apphas the Android app. It is the same TableSathi, but it can make a sound for a new order, a ready item or a low-stock warning even when the browser is shut. iOS is coming.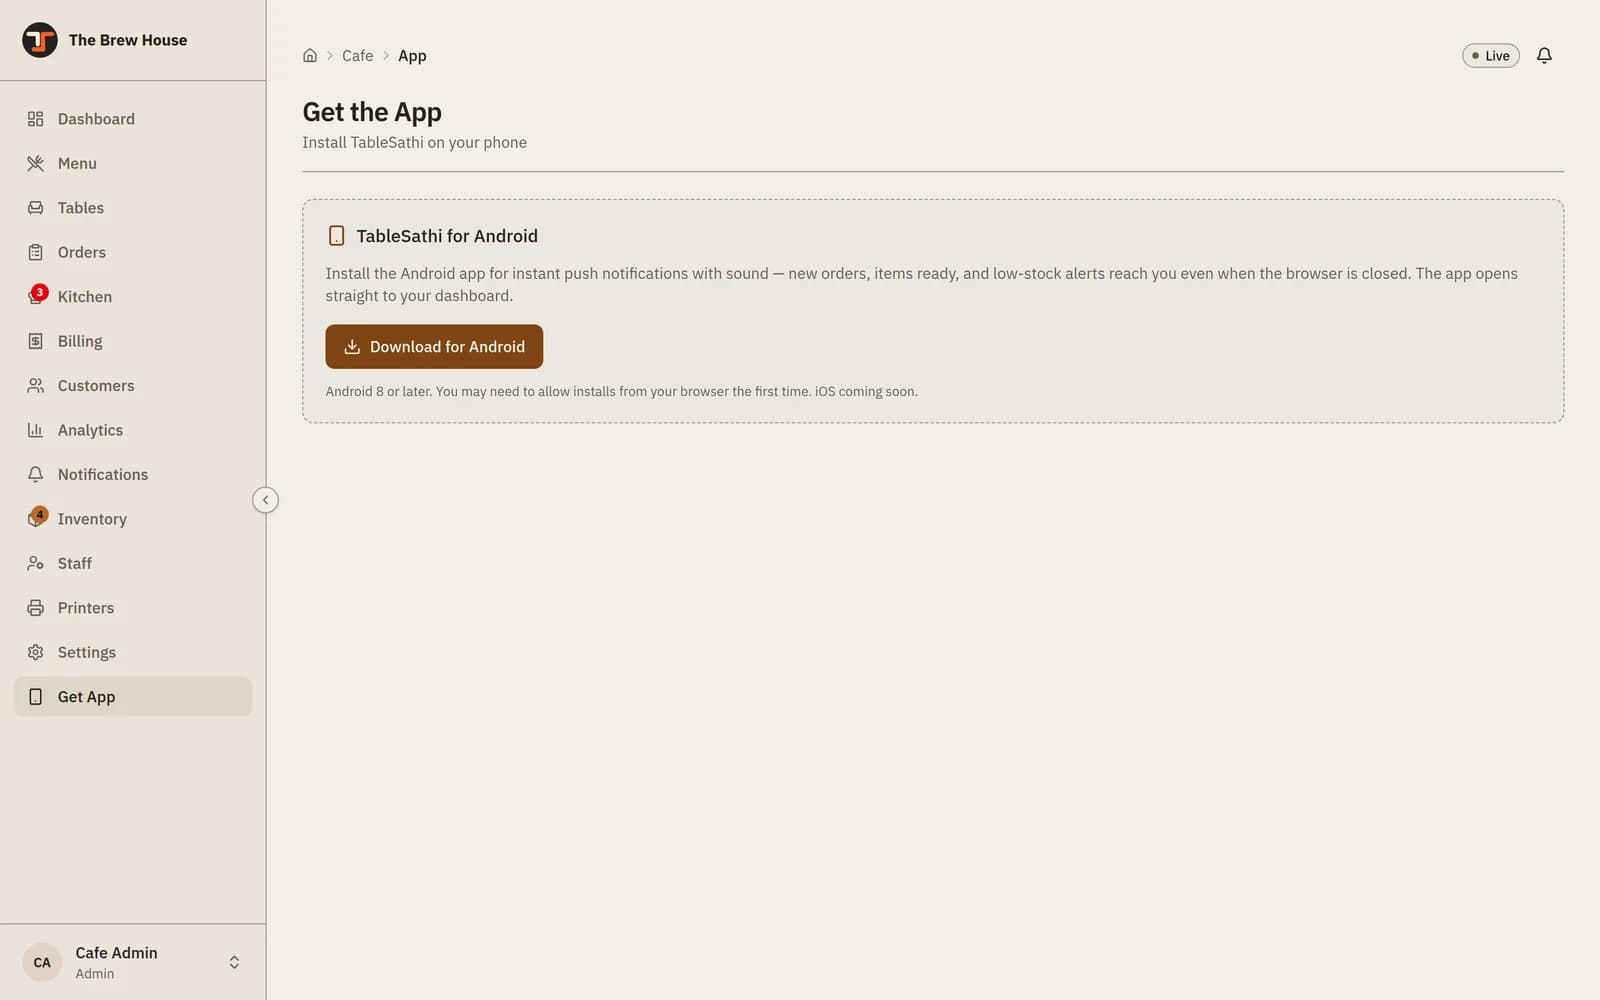
Worth installing for whoever runs the kitchen screen.Open full size ↗
Who sees what
What the four presets switch on. The owner always sees everything; a staff member sees only the screens granted to them, and the sidebar shows nothing else.
| Screen | Waiter | Cook | Cashier | Manager |
|---|---|---|---|---|
| Orders | ✓ | ✓ | ✓ | ✓ |
| Tables | ✓ | — | ✓ | ✓ |
| Kitchen | ✓ | ✓ | — | ✓ |
| Billing | — | — | ✓ | ✓ |
| Menu | — | — | — | ✓ |
| Inventory | — | — | — | ✓ |
| Customers | — | — | — | ✓ |
| Analytics | — | — | — | ✓ |
| Printers | — | — | — | ✓ |
| Staff | — | — | — | — |
| Settings | — | — | — | — |
Presets are a starting point
After applying one you can switch any single screen on or off. Staff and Settings stay with the owner in every preset — those are the two that change money and access.
If something looks wrong
A staff member can’t see a page they need.
The owner opens Staff → ⋯ → Permissions and switches that screen on. It appears in their sidebar on the next page they open.
Somebody forgot their password.
Same ⋯ menu, Reset password. A new one is shown once — write it down before closing.
A table shows in use but nobody is sitting there.
Its bill is still open. Go to Billing, pick that table, and either settle it or press Void Bill if it was opened by mistake.
The wrong item went to the kitchen.
On Orders, reduce the quantity or cancel the item while the bill is still open. Once a bill is settled it is fixed — the correction is a credit note, which the owner issues.
The screen looks out of date.
Check the Live dot at the top right. If it is not showing, the device has lost its connection — reload the page once the internet is back.
Screens shown are from a demo cafe. Your own menu, tables and staff will differ; the buttons will not.
Still stuck?
Write to us with your cafe name and what you were trying to do, and we will walk you through it.
Get in touch→